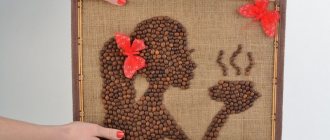
Master class for beginners
Tools and materials
To design a stylish topiary, first of all you will need coffee beans. If possible, try to purchase the highest quality coffee; preference should be given to products in which the beans are evenly roasted and have the same size
It is very important that they are dried carefully. Before starting work, you need to sort the grains, of course, this activity is optional, but if you want to get a truly beautiful topiary, then it is advisable to do this
First, any damaged grains should be removed, and the rest should be divided into 4 groups. The first will include the most beautiful beans of the same size, they will be located at the top of your future coffee tree. The second group includes rounded grains - they are usually used to decorate flowerpots. The third includes whole grains, but they are not beautiful enough; they are used to decorate the lower part of the crown. The fourth group includes the smallest grains - they are used to finish the spaces between the remaining grains.
You will need the following.
- The base is usually a ball or a heart - you can buy it ready-made in the store or make it yourself from paper or foam. Threads will be required in almost all options for creating topiary.
- Varnishes and paints are needed for application to the base.
- Wire/tube/skewer or tree branch is necessary to ensure that your topiary has a trunk.
- Glue - it is better to give preference to a hot glue gun.
- Plaster/alabaster – prepare these along with a mixing bowl.
- Sharp scissors.
- Flowerpot. These options are very different, ranging from flowerpots and pots, ending with ordinary jars or unnecessary mugs.
- Scotch tape - to create a topiary you will need double-sided tape.
- Additional decor - the finished craft is decorated with bows, flowers and beads. Also used are cinnamon sticks, as well as cloves and dried fruit slices.
How to do it?
On the Internet you can find many master classes on how to create a coffee topiary with your own hands. We invite you to familiarize yourself with the step-by-step instructions, which include several popular techniques and are characterized by exceptional ease of implementation.
Step one - work with the workpiece. To create a round topiary, you need to take a base prepared in advance in the shape of a ball or heart. The workpiece is pasted over with paper and wrapped with knitting thread, preferably in dark shades.
It is necessary to cut out figures of equal shape from cardboard and place a tube between them, it will act as a trunk. Both blanks are glued together, then pieces of cotton wool or disks are attached to the base thus obtained, giving the desired volume. After you prepare the base and paint it, you can begin to paste it with coffee beans, it is advisable to do this not in one, but in two rows - in this case, the first layer is placed with the flat surface inward, and the second layer is the opposite.
Step two - we design the trunk. The wire or stick that you plan to use as the stem is carefully covered with strips of tissue paper. If it is not there, you can use satin ribbons or jute thread and then secure it to the crown. When working with wire, you can bend it a little.
Step three - plant it in a flower pot. First you need to mix a certain amount of gypsum-based solution and pour it into the prepared container. After it begins to set a little, a topiary is placed in the center and held until the mass hardens completely. When the plaster has dried, the so-called soil can be covered with a thin layer of ground coffee, wood shavings, sisal or dried moss.
Step four. Decorating the topiary. If we talk about coffee tree decor, then there are no limits to your imagination. You can stick on traditional ribbons, curls, beads and bows made of foamiran, or you can show your imagination and combine coffee with figures of insects, animals, star anise, coarse fabric and other decorative elements.
What to cover with?
Some needlewomen prefer to coat their coffee trees with a mixture of coffee and PVA - this is not necessary, but this treatment will make the craft more shiny. Usually the glue is mixed with water in equal proportions and instant coffee is poured in until the desired color is achieved. You can add a little cinnamon and cocoa to this mixture - in this case, the topiary will turn out even more fragrant and fill the house with an atmosphere of family warmth and comfort.
This treatment allows you to close the gaps well, as well as mask all traces of glue. If desired, you can apply a layer of varnish. Of course, this will remove the pleasant coffee aroma, but it will protect the product from dust accumulation.
Basis for different results
Decorative trees made from coffee beans often have the shape of a ball. And thanks to the varied decor, they are transformed into completely different crafts.
In order to create a coffee base for topiary, you need to take a newspaper, crumple it into a tight ball, place the ball in a nylon stocking and, pulling the nylon, tie it with thread.
Then twist the rest of the stocking and wrap it around the newspaper ball again.
This manipulation should be done three times. The simplest option is if you have a foam ball on hand.
Coffee beans are glued onto the ball with hot glue in two layers. In this case, the top layer of grains is fixed with a chip outward.
In order to make a gentleman from the prepared base, it is enough to add an additional wire - “arms” - just above the center of the trunk, tightly wrapping it around the stick, fixing it with glue and wrapping it with threads.
The gentleman’s “fingers” are also created from wire and attached to the ends of the wire with glue and thread.
Step-by-step master class with photos - heart-shaped topiary
Stage I. Making flowers from ceramic plasticine
Ceramoplasty is an inexpensive and very convenient material for making flowers: it is plastic, dries quickly, and does not require heat treatment. For the topiary heart “On the Wings of Love” we will make 21 roses from ceramic plasticine, using several shades of pink.
We twist the petals using the “cabbage” method. To get a realistic rose, use shades from dark at the core to light at the edges. Identical roses, but purple, were used for the Lavender Sea sea topiary.
It is enough to mix 2 colors - pink and white - to get the necessary gradation of shades of pink.
Stage II. Forming the crown of a tree of happiness from coffee
We paint the foam heart with any brown paint so that when the coffee is glued, the foam does not melt under the hot silicone. It is better to use acrylic: gouache is smeared. Also now it is necessary to strengthen the sanded trunk at the base and paint it in 2 layers with white acrylic.
We cover the entire surface of the heart with coffee beans - in a chaotic order, in sections. After drying, we thickly paint the texture with gold, shade it with brown acrylic and lightly dust it with white paint.
Popular articles Master class New Year card assemblage New Year card in eco-style
Stage III. Crown decor
Compositional - the right half of the heart. We glue dried flowers, alternating with white stamens and pink smooth berries. We glue pearls all over the crown, and on the left half we place an elegant decorative butterfly with a backing - a bow made of satin ribbon with polka dots.
Stage IV. Pouring, filling and decorating the pot
We use a snow-white ceramic cup as a pot: we decorate it with pink lace and a satin polka dot ribbon. To strengthen the heart-shaped toparium, we will use plaster casting. We dilute the thick mixture (gypsum + water) directly in the cup, put pieces of foam plastic so that the alabaster does not split the container when it expands.
The gypsum fill dries in 2-3 hours, but in order for all the moisture to evaporate, we recommend leaving the topiary heart in a ceramic cup overnight. All the secrets on how to strengthen topiary onto alabaster.
We lay pink sisal in a “nest” on the dried plaster surface. On top we glue a feather, 9 roses and pearls and stamens. The composition is completed with a small satin bow, metal pendants - a lock and a heart with an arrow - and a pink rose on a cup.
Stage V. Making wings
We cut out the base for 2 symmetrical wings from the flat bottom of a foam plastic food tray, having previously drawn the outline with a pencil or pen. We seal the wings on both sides as thickly as possible with natural feathers: the foam base should not be visible. Glue the wings symmetrically to the back of the coffee heart.
It is important to use a white foam tray: the base is visible through
A complete collection of topiary ideas from Alena Tikhonova!
Instructions for making a fragrant composition
You can make such compositions yourself.
There is nothing complicated in this type of needlework. If you have all the necessary materials, each person will be able to make a decorative tree in a few hours. In this article we will talk about such a variety of this souvenir as the “Heart” topiary. The list of necessary materials for making a composition in the shape of a heart with a divine smell is as follows:
- cup and saucer;
- foam heart (souvenir on a stick);
- masking tape;
- wire;
- heat gun, “Moment” glue;
- coffee beans;
- gypsum;
- Knitting;
- needle;
- brown acrylic paint;
- satin ribbons;
- star anise.
Let's learn how to make a “Heart” topiary from coffee. We follow all the steps as described. We wrap a piece of wire with tape. We apply glue to it and place threads on top. We wind them very tightly. Give the wire a spiral shape. Cover the foam heart with masking tape. We thread a piece of thread into the needle, pierce a heart in the top in the middle and pull the yarn through, forming a loop.
Next we paint the blank with acrylic paint. When it dries, cover the heart with coffee beans with the convex side up. We place the second tier of aromatic material with the grooves facing up. We decorate the figurine with an anise flower. We decorate the trunk with a satin ribbon. Glue the cup to the saucer. We dilute the plaster and pour it into the container.
Green sculpture
First you need to understand - what is it? A medium-sized figurine resembling a plant or shrub is called topiary. This art has come down to us since the times of the Roman Empire.
It was then that the fashion for decorating houses with objects created by nature began. The tops of the bushes were pruned in a certain way, embodying geometric and artistic images.
Nowadays, this art appears in the form of a small tree in a pot, designed to enliven modern homes. It is “grown” from the most accessible things, what is always at hand - change from a wallet, sweets, colored cardboard, satin ribbons - all this can be useful for a future creation.
The process of realizing such beauty is quite painstaking, but it will take no more than 2 hours. But the result will exceed all expectations. Such a homemade product contains a piece of the master’s soul, which he puts into working on it. This makes it attractive and unique and makes it possible as a gift for loved ones.
Having answered the question, what is the name of a craft in the form of a tree in a pot, and what are its functions, it is worth thinking about its use in everyday life.
In what rooms is the presence of such an accent acceptable? Is it appropriate to use it in workplace decoration? What decor style does it go with? What can you make such an exclusive thing from so that it fits well into your living space?
Do-it-yourself coffee tree of happiness - master class from a branch
A person with imagination often does not need to spend money on buying special materials for crafts. In skillful hands, a dry branch and old newspapers will turn into an original gift. From this material you can make an excellent topiary with a “natural” trunk.
1) To create a topiary crown, newspaper is generously coated with glue and rolled into a tight ball.
2) We clean the branch with sandpaper from roughness on the surface to a smooth texture.
3) The newspaper is coated with glue and wrapped with thread to secure the round shape. The procedure is repeated several times until the newspaper ball reaches the desired size.
4) The end of the branch is smeared with glue, and a ball of newspaper is glued.
The highlight of this composition will be the natural appearance of the trunk from the branch, which emphasizes the naturalness of the topiary.
Advantages
Now anyone can do fortune telling in their own kitchen. Why pay when you can look into tomorrow and remember the past? The simplicity of preparation for the sacrament is attractive: you need a Turk, coffee beans (if you have a mill) or instant coffee. Cooking recipes are available on the Internet. There is no need to study manuals like in Tarot cards. There are enough interpreters and reference books of patterns, where there is an explanation of the resulting images of animals, figures, numbers, letters
Practicing magicians advise thinking about an important issue, affairs, problems. The shallow trance into which a fortune teller falls on coffee grounds will reveal at the subconscious level the meaning and definition of the received symbols
In unity with nature, with the elements of the Earth, the energy of the drink and our planet merge. This is how esotericists explain the accuracy of answers to questions about the past, present, and future.
Not everyone has the ability to understand abstract images. And everyone sees the signs in their own way. Therefore, there is no need to consult with outsiders. It's very personal. Therefore, choose a quiet room, with dim lights, and privacy. The ritual can be performed at any time of the day, but not after midnight, when demonic forces are activated. Negative points:
- You cannot add anything to the drink prepared for fortune telling. These ingredients will change the consistency of the liquid and the results will be incorrect. If a person does not drink bitter coffee, he will have to be patient. The other side of the coin is that there will be no pleasure from ingestion, which may affect the result;
- any fortune telling, even coffee grounds, can be wrong. The result lies on the “conscience” of the beholder: if you don’t have a lot of practice, the result will not be entirely correct;
- opening the veil and looking into the future resolution is a sin according to church canons;
- lack of patterns for interpretation - an incorrectly formulated question or insufficient concentration on the process. The result will be a blurred pattern or a continuous canvas of sediment in which nothing can be seen. Taking this as a sign that the Universe does not want to communicate with you and it is better to postpone the divination is the best thing in this situation; Often you want to see only what you want. Consciousness does not accept negative signs and therefore can be ignored;
encyclopedias, reference books, interpreters are unable to accurately explain the symbols seen by a specific person. The formation of patterns consists of circumstances, life positions, and the psychological state of a person at a given moment. It is impossible to describe every situation in books. Therefore, the prediction may be incomplete and not entirely correct.
Topiary heart in heart - an unusual design solution
DIY decorative trees are gradually gaining popularity. This is due to the ease of manufacture and the ability to beautifully decorate an apartment without any special financial costs. The trimming technique is especially popular. Thanks to it, you can create interesting compositions, in particular in the shape of a heart.
Trimming is a three-dimensional appliqué based on crepe or corrugated paper. It is quite possible to create an interesting composition from ordinary napkins. It all depends on the person himself.
A topiary made from napkins is the best gift, especially if your financial situation does not allow you to spend money. A heart made of wood is a good way to surprise a person and present him with an interesting gift made with your own hands.
Necessary materials for creating topiary
- Styrofoam.
- Red napkins.
- Wooden skewers.
- Construction gypsum.
- Ribbons.
- Scissors.
- Glue.
It is recommended to create beauty from the ground up. To do this, diluted alabaster is poured into a prepared plastic pot. Then a wooden skewer is inserted into it, and the workpiece is removed to the side until it hardens completely. In the meantime, you need to start creating the heart itself. To do this, the desired shape is cut out of polystyrene foam (using this material will allow you to get a three-dimensional tree). It is recommended to cover the end parts with adhesive tape or paper, this will eliminate looseness.
Popular articles Truth and myths about the benefits of coconut oil
Next, you need to take napkins and cut them into small pieces. Then, one by one, you need to place a skewer in the center of each square and start scrolling through it. Without removing the shred from the skewer, it must be dipped in glue and attached to the foam blank. This way the entire heart is covered. Then the finished part is attached to the base, the pot is decorated with bright beads, and that’s it, this is where the production ends. The result is an interesting decorative element.
Coffee heart topiary - a beautiful and simple decoration
A coffee heart is an interesting decorative element that you can easily create with your own hands. First you need to prepare special materials and tools.
For this purpose, the following mandatory components are taken:
- Cardboard.
- Wire.
- Coffee.
- Yarn.
- Cotton wool or cotton pads.
- Green paper or paint.
- Pot.
- Glue.
First, you need to draw a heart on cardboard and cut it out; in total, you need to prepare 2 blanks. Cotton wool or cotton pads are glued to one piece of cardboard, then the second piece of paper is applied to them. The resulting heart is wrapped in yarn; it is advisable to pre-treat the surface with glue. Depending on the material, you need to wait some time until the workpiece completely hardens. Then you can begin further decoration. Glue is applied to the surface of the yarn and coffee beans are applied. You can lay them out in solid lines, or only partially cover the workpieces.
The trunk is attached to the top of the heart. It is made from wire; it can be pre-positioned between two pieces of cardboard and cotton pads. This will make it more durable. The trunk is decorated with green paper or paint. You can choose any shades, depending on personal preferences.
At the last stage, the topiary is installed in a pot. It is advisable to secure the trunk at the base with coins or pebbles. In some cases, building gypsum is used, which is decorated after drying. Thus, a unique coffee tree is created.
Coffee topiary in the shape of a heart - master class
The work of making a coffee topiary in the shape of a heart begins with preparing the base for the heart. It is convenient to use corrugated cardboard as a frame. Draw a heart on it (let's make it a little smaller than we want to get as a result - it will increase due to pasting the coffee).
Let's cut out our base.
From the remnants of corrugated cardboard, we will cut out a couple of small triangles and glue them in the center of our workpiece on both sides - this is the first stage of giving our heart a three-dimensional shape.
Now, to make the heart look even more voluminous, we will cover it with cotton pads - 6-7 pads on each side. If necessary, use glue.
Now let's tighten our workpiece with simple threads. Color does not matter.
As a result, we got a soft, voluminous heart.
It is advisable to paint our workpiece brown. Regular gouache will do. Don't have any brown paint on hand? So, let's mix red and black in equal parts!
When the paint dries, glue a twine loop to our heart. The loop is attached at the top, in the middle. We use hot glue.
The most painstaking stage of the work is to cover the heart with coffee beans
It is important to apply hot glue to the grain itself; we place the coffee with the convex part facing up. So, we glue the first layer of coffee beans.
The glue dries instantly when it cools, so immediately glue the second layer of coffee (the same as the first)
Cover the finished heart with acrylic varnish. While the varnish dries, let's work on the pot. We take any container of a suitable shape and size and begin to cover it with simple twine.
We fix the twine where necessary. We work with hot glue.
We decorate the top of the pot with a braid that we wove from twine.
Cover the finished pot with acrylic varnish. The varnish will glue the twine threads together. If necessary, this varnish can be slightly diluted with water or replaced with PVA glue.
We will make the trunk for the topiary from three long pieces of thin steel wire. Put them together and wrap them with electrical tape.
Now we wrap the wire with twine and, if necessary, use hot glue.
We bend the wire with pliers, giving it the desired shape.
We plaster the topiary trunk in a pot. To do this, just dilute the dry alabaster with water, pour the mixture into the pot and secure the trunk of the coffee tree there.
Let's hang a coffee heart on our trunk.
To decorate the top and bottom of the topiary we use satin ribbons.
Glue several pearl beads onto the trunk.
All that remains is to decorate the inside of our topiary pot for Valentine's Day. Apply transparent polymer glue liberally to the already dried alabaster and sprinkle decorative primer of the desired shade on it. Let's add a few beads.
After the polymer glue has dried, the work can be considered complete. If desired, such a heart-shaped coffee topiary for Valentine's Day can be made with your own hands in just 1-2 days. Try it, everything will work out!
Wedding topiary “Heart”. Preparatory work
A decorative tree made according to the following instructions will not only be a wonderful gift for newlyweds on their wedding day, but also a worthy decoration for the ceremony hall. To make such a souvenir with your own hands, you need the materials listed in the list:
- white plastic flower pot (without a hole at the bottom);
- artificial flowers (small roses);
- white napkins - 10 packs;
- thick cardboard;
- plastic tube;
- satin and nylon ribbons;
- plaster or alabaster;
- water;
- solution container;
- scissors;
- pencil;
- paper;
- hot melt adhesive.
Coffee topiary with hearts "Valentine's Day". Master Class
In this master class we will look at the process of making a composition for Valentine's Day - a coffee topiary in the shape of hearts.
For work we will prepare corrugated cardboard, twine, coffee beans, a pot, wire, a heat gun, acrylic varnish, scissors, pliers and brown gouache.
Coffee topiary with hearts - master class
Let's start by preparing the heart templates. Templates are drawn on corrugated cardboard and cut out. First, draw and cut out a small heart.
The template should be much smaller than the heart you plan to get after you finish covering it with coffee beans.
Now we take a small heart and, following its example, draw and cut out a large one, with a notch in the middle.
It wouldn't hurt to add some volume to corrugated cardboard hearts. We cover the small heart on both sides with cotton pads and tie it with cotton thread.
Wrap the big heart with jute twine. In some places we glue the twine thread with hot glue.
Wrap the heart with another layer of twine.
We saturate the large heart with acrylic varnish or PVA glue so that the twine threads stick together.
Paint the small heart with brown gouache.
We will make the trunks for our hearts from simple wire. You can use aluminum or steel.
We wrap the wire around a tube with a diameter of about 2-3 cm and get curved stems for the hearts. Bend the edges with pliers.
Wrap the trunks with twine. In the meantime, our hearts have dried up - you can attach them to the wire!
We attached the hearts to the trunks and, if necessary, glued them with hot glue.
We begin to glue coffee beans onto the hearts. Glue the grains in two layers. The first layer – we place the grains with the convex part up.
When we glue the second layer of coffee beans, turn them over, placing the convex part down.
We got two hearts on wire trunks. You can coat them with acrylic varnish. While the varnish dries, let's work on the pot.
We will cover a flower pot of suitable size with twine.
When the pot is completely covered with twine, cover it with acrylic varnish or PVA glue. After the varnish has dried, plant the topiary in a pot. We dilute the alabaster with water, put the mixture inside the pot and place the hearts there. We hold it a little so that they do not move while the mixture sets.
At the base of the hearts we attach decor - bows made of satin ribbons.
Apply PVA glue thickly to the dried alabaster and pour in the remaining coffee beans.
We decorate the pot with a bow made of twine.
The coffee bean topiary can be considered complete!
A wonderful coffee aroma and wishes of love - all this will be presented to its owner by the “Valentine’s Day” coffee topiary!
Homemade romance
Before starting work, you need to prepare the necessary material:
A heart template is drawn on the cardboard, the size of which should be 1 cm smaller than the intended craft. Two parts of the same type are cut out - hearts.
The end of the aluminum wire is wrapped with tape (glue is placed on tape better than on aluminum).
With the part treated with tape, the wire is placed in the center of the template, as shown in the photo, and fixed to the cardboard with hot glue.
The wire is covered from above with a second piece of cardboard.
In order for the craft to acquire a three-dimensional appearance, you should cover its surface with cotton pads on all sides, and then wrap the resulting part with threads.
The workpiece is painted brown with gouache and left to dry (on average 1 day).
The resulting part is glued with coffee beans.
Work begins from the edge of the workpiece.
In this case, the coffee beans are laid out with the gap down and fixed with hot glue.
The process continues from edge to middle until the space is completely covered with coffee beans.
A second layer of decor is applied in a similar way, with the only difference being that the coffee beans are positioned with the gap facing outward.
The resulting heart is treated with acrylic varnish.
The yogurt cup should be treated with hot glue and wrapped in crepe paper.
The top of the jar is decorated with a satin bow to match the paper.
The craft consists not only of coffee beans, but also of satin ribbons decorated in the shape of flowers.
By randomly twisting a pink satin ribbon, flower buds are formed.
The ends of the tape are fixed with hot glue. For such a composition, 9 roses are enough.
Three satin flowers are attached to the finished coffee heart.
Separately, a bow is created from the remnants of the ribbon, which must be fixed with glue at the base of the heart.
The bow, flowers and part of the heart are decorated with rhinestones.
Topiary needs a stable base. Therefore, a mixture of alabaster, cement and sand, diluted with water, is placed in the prepared jar.
The consistency of the composition should be thick so that the composition does not tilt to the side before it dries.
The trunk of the tree is inserted into the center of the jar with the mixture. After a couple of hours, the top part of the composition will harden and can be painted with acrylic paint.
The work is left for final drying.
When the craft has dried, the remaining satin roses are added to the base of the tree. They are fixed with polymer glue.
The heart made of coffee and flowers is ready.
MK: topiary made from coffee beans
Before you start making a tree, make sure that the coffee beans are suitable. Preferred beans are good, high-quality coffee, evenly roasted and even.
The tree will need a base, which can be purchased or made. So, you have decided whether it is a heart or a ball. The base, if it is already dense, is immediately coated with paint, which will merge with the grains. If you want to make a ball with your own hands, carefully remember the paper to make a lump, tie it with threads, giving the lump the shape of a ball as much as possible. If you decide to make a heart, a foam blank will be more convenient.
Popular articles Do-it-yourself postcards for March 8th from paper, cardboard and napkins
Coffee topiary (photo master class step by step)
A foam blank or any other base is covered with paper, wrapped with thread and painted
In order to make a trunk (what would a tree be without a trunk), you can take either thick wire or a sushi stick; some even use paper towel tubes. So, the selected rod needs to be made into a trunk. It can be wrapped with satin ribbon, twine, corrugated paper or tissue paper
The trunk must be glued to the crown. Initially, you can make a small hole in the workpiece to fit the diameter of the barrel. Fixation with glue must be strong and neat
Next, make soil that a cup or disposable glass can hold. How to make primer correctly can be seen in numerous MK videos; this will not be superfluous if you have never worked with gypsum. The volume of liquid is measured by the container where the coffee tree will stand. In this case it is a glass. After preparing plaster or alabaster, it is poured into a container. The container should not be filled to the very brim, since the top will still be decorated. Insert wood into the plaster in the center and wait for the mass to harden.
The base is smeared with glue, after which coffee beans are fixed on it. This is often done in two layers. One layer - flat side inward, the other - vice versa
While the glue dries, you can prepare a stable base in the form of a glass cup (you can also use a regular jar), partially decorating it
The topiary must be placed in a cup, gluing it to the bottom and filling the cavities with coffee beans, coating each layer with glue
After everything has completely frozen, you can cover the top layer with layers of coffee, or, for example, shavings or sawdust. Decor for the tree is done at your own discretion
DIY heart topiary: step-by-step instructions
Every housewife can create a unique decorative element. You don't have to have artistic skills to do this. The design and manufacturing process are so simple that anyone can learn this technique.
To conduct a master class you need to prepare the following elements:
- Napkins.
- Glue.
- Heart shape.
- Paper.
- Wire or pencil.
- Beads.
- Nail polish.
- Satin ribbons.
- Cling film.
- Scissors.
- A brush.
- Stones.
- Construction gypsum.
First, a heart is made. It can be made from cardboard and cotton wool, or polystyrene foam. In this matter, everyone decides for themselves what to choose. You need to decorate the heart using napkins. They are glued to the workpiece according to the trimming technique. Additionally, the heart can be decorated with beads, which will give it originality.
The resulting elements are interconnected and complemented with beads, ribbons and stones. In this case, everything depends on the person’s imagination. The process of making topiary is standard.
Then you need to start making the barrel. It can be based on a pencil, wire or wooden skewer. The trunk is installed at the base of the heart and the pot. For strength, diluted alabaster must be poured into the pot. After hardening, it can be decorated with paints, beads, paper and varnish. The trunk itself is wrapped in satin ribbons and painted. You can also decorate the pot.
Original ideas for topiary
Don't be afraid to experiment and use your own imagination when making a coffee tree. There are many different variations of topiary, here are some stylish ideas for crafts.
Classical
Traditional coffee topiary has a round shape. There are no special decorations here; it is best if the craft is made in soothing shades using natural materials. This is a simple and truly elegant option that is suitable for interior decoration in different styles.
Valentine's card
A heart-shaped topiary can be given as a surprise on February 14th. The base is sold in stores with floral materials, but you can also make it yourself using available materials.
"Flying" cup
Crafts like these seem incredibly complicated, but they are quite easy to make yourself. To do this, you will need a piece of wire, a glue gun or a can of polyurethane foam.
Tree with flowers
A tree with delicate flowers will be a wonderful surprise for a gift on March 8, birthday, etc. In addition, such a topiary can be placed in the living room or bedroom.
With birds and butterflies
Imagine a stylish tree with dragonflies, butterflies or birds sitting on it. This craft looks truly spring and reminds you of warm days, regardless of the weather outside.
fruit tree
Decorate the craft with dried fruit slices, for example, citrus fruits, the result will be a wonderful decorative item for the summer table. However, such topiary can easily be complemented with New Year’s table setting.
Money Tree
A coffee “money” tree is a good surprise option for men. It can be made in the same way as an ordinary topiary, the only difference is that the ball needs to be covered with coins, then zipped around them and finally covered with coffee beans.
New Year
A topiary in the shape of a Christmas tree will be a wonderful table decoration during the holidays, and will also complement the homely New Year's atmosphere. You can buy the base blank additionally or make it yourself. To do this, just roll the cardboard into a cone and trim off the excess pieces.
Double and triple
This craft requires more time, but the result is a really beautiful topiary. Several crowns develop from one stem or “grow” from two or three trunks at once, which may have different thicknesses and heights.
Ball
This is not exactly topiary, but a coffee ball is made in a similar way. The difference is the absence of a trunk, and in shape it will not at all resemble a tree. You can combine coffee beans with seeds and legumes in a composition. A stylish option can be achieved by placing several balls in a beautiful glass dish or vase.
If you like to surprise and delight your friends with non-standard gifts, you will definitely like this type of craft like coffee topiary. After all, all that is required to create it is simple devices and materials, accuracy and patience. Well, a drop of inspiration, of course!
Description of the process of making topiary from threads
This method of creating a decorative tree is quite simple, but as a result of the work you get a charming composition. To make it you will need the following materials and tools:
- red, white and pink yarn;
- a sheet of thick cardboard;
- paper;
- pencil;
- scissors;
- PVA glue;
- a piece of sheet foam;
- plasticine;
- cardboard tube (base from cling film or toilet paper);
- cotton pads;
- beads;
- wooden stick;
- wire.
Let's learn how to make topiary “Heart” according to the following description. From a cardboard tube we cut a blank in the form of a cylinder 5 centimeters high. We put it on cardboard and trace the bottom with a pencil. Cut out two identical round parts. We make a foam blank of exactly the same diameter. We glue the cardboard circle to the cylinder, forming the bottom of the container in which the tree will stand.
How to make a heart for topiary? Draw a sketch of this figure on paper and cut it out. We transfer the template to cardboard and make two identical blanks. We cover each figure with cotton pads on both sides. We glue a wooden stick onto one of the blanks. We coat the hearts with glue and place one on top of the other so that the skewer is inside the product.
When this blank dries, we cut off the edges of the cotton pads that protrude beyond the contours of the figure. Next, we begin to decorate the heart-shaped topiary. We wrap red yarn around the part decorated with cosmetic mugs. We apply the threads tightly to each other so that no gaps are created. When the work is finished, glue the end of the yarn.
We cut out blanks (4-5 pieces) from cardboard in the form of small hearts. We pierce each figure with pieces of wire, the length of which is 20-30 cm, and secure their edge in the form of a loop at the bottom of the cardboard element. We wrap all the blanks with threads. We wrap the wire around a wooden stick, placing the hearts in different directions.
We insert the skewer with its lower end into the container, pressing it into the plasticine as deeply as possible. We decorate the topiary trunk with white threads, arranging them in a spiral. Apply glue to the outer sides of the cardboard pot. We put pink yarn on it and wrap the container tightly. We decorate the place under the tree with scraps of red thread and attach them to PVA. Here we arrange the beads in random order. The composition is ready.
A decorative tree made according to the following instructions will not only be a wonderful gift for newlyweds on their wedding day, but also a worthy decoration for the ceremony hall. To make such a souvenir with your own hands, you need the materials listed in the list:
- white plastic flower pot (without a hole at the bottom);
- artificial flowers (small roses);
- white napkins – 10 packs;
- thick cardboard;
- plastic tube;
- satin and nylon ribbons;
- plaster or alabaster;
- water;
- solution container;
- scissors;
- pencil;
- paper;
- hot melt adhesive.
Wedding topiary “Heart” - the photo confirms this - looks charming and tender. Let's make such a souvenir according to the following description. We make a heart-shaped template from paper. We transfer it to cardboard, trace it and cut it out. We fold three napkins together and crumple them into dense “balls”. We paste these blanks over the entire surface of the cardboard base on both sides. We fasten the elements close to each other, there should be no gaps.
We coat the plastic tube with hot glue at the bottom and apply it to this place
We wrap it around the “trunk” in a spiral to the very top. Secure the tip with glue. We glue this detail to the “crown” of the topiary, decorated with napkins. We dilute gypsum (alabaster) according to the instructions indicated on the package. Its consistency should be similar to sour cream. Fill the flower pot with the solution, without adding 5 cm to the top.
We insert the product in the middle. We hold the figure for several minutes, allowing the liquid to harden. We decorate the surface of the heart with artificial roses, gluing them tightly to one another. Lubricate the area under the barrel with glue and place tape on it in random order. We tie a lush bow from a wide nylon ribbon onto the pot. An exclusive gift for the bride and groom is made.