What gift can be given for absolutely any occasion to both a man and a woman? Of course, the one made with your own hands also symbolizes well-being and happiness. A great option would be coffee bean topiary . It is very simple to make, but at the same time it will easily fit into absolutely any interior and will delight the owner with a pleasant coffee aroma! You will learn how to make such a topiary with your own hands in this article.
Topiary made from coffee beans
What is topiary?
Coffee topiary is the so-called Tree of Happiness. It is a beautiful decorative craft that looks like a small tree in a pot, but instead of a crown it has an element decorated with natural coffee beans.
Coffee beans
On a note! Hot Ethiopia can be considered the birthplace of coffee. They learned to prepare the drink from it only in the 13th century, although the first mentions of coffee trees can be found in historical sources dating back to the 1st century AD.
Stylish coffee topiary
Previously, coffee was considered a drink of rich and privileged people and was a symbol of wealth and prosperity. Now everyone can afford to drink this drink. By the way, the history of topiary began a long time ago in Rome. It was there that they began to trim trees so that their crowns acquired a special shape. And such crowns became the prototype of modern topiary.
Who can you give topiary to? Only to the person you wish happiness to! And, of course, a fan of the coffee drink.
A neat topiary made from coffee will be an excellent gift.
DIY coffee tree
In the first master class on how to make a coffee tree with your own hands , we will combine two popular techniques for creating decorative decorations for the interior: the technique of creating topiaries and bonsai from beads. This is exactly what our tree will be, where aromatic natural coffee beans will be combined with beautiful golden beads.
A tree made from coffee beans with your own hands will decorate any interior; it will fit into both the interior of the living room and the interior of the kitchen. Such a gift will make any housewife happy, so if you are at a loss as to what to give your friend for her birthday or March 8th, then crafts made from coffee beans will be the ideal solution. And for a couple on their wedding anniversary, you can make a heart decorated with coffee.
Our tree will be about 40 cm in height, but you can make it taller or smaller and more decorative. For the craft, you need to prepare a set of materials and tools, because you need to make not only the coffee component, but also beaded leaves, and also prepare the materials to fix the finished tree in a decorative pot.
Of course, you can choose any beads, but it is best to choose those colors that would combine with the natural color of the coffee beans and highlight them, so we settled on two shades - brown and amber. Such beads will look very beautiful, especially if you choose transparent ones with a golden core. We will also need gold beading wire, which we always use when creating bonsai. For a strong frame, we will need another wire, about 4 mm thick, we will twist it in several layers, so a piece of about one meter may be required. The wire will also be used to create a frame for the branches; its thickness can be about 2 mm; about 5 meters will be needed.
Now let's move on to the materials that will be used directly to create the topiary: about 100 grams of grains and a floral ball, which can be replaced with a plastic Christmas tree ball; you can definitely find one in every home. We will attach the finished topiary to a coffee cup, and additionally decorate the saucer. We will also need paints - white and brown, Moment glue and PVA glue, aerosol varnish, plaster to secure the tree trunk.
Coffee topiary in the interior
The coffee tree can be placed on the desktop in the office, in the kitchen, and on a shelf in the living room - it will look good everywhere and will easily fit into the interior. The product can be as simple as possible or decorated with interesting decorative elements. The crown can have the shape of a traditional ball or a beautiful heart, cone, and so on.
The decor of the coffee topiary can be anything
Some decorate gazebos in the country or even children's rooms with topiaries. Depending on the shape of the crown and how it is decorated, this tree can easily fit into absolutely any conditions.
Beautiful coffee topiary
How to make a coffee tree with your own hands
Now you can move on to the main stage, how to create a coffee tree with your own hands. The master class with photos will tell you not only how to attach the beans to the base, because even a child can handle this process, but also how to properly make leaves from beads on a wire base.
First you need to sort out the coffee beans: select only whole beans, preferably the same size. A plastic Christmas ball must first be coated with brown paint or decorated with a jute cord, which can be glued to the ball using glue or double-sided tape. The paint must be applied in several layers so that the surface is evenly painted.
We begin to make a coffee tree with our own hands step by step : the beans must be glued to the base at the “Moment”, because PVA will not ensure reliable fixation of the elements. Sometimes the grains are glued in two layers.
If you make the “Heart” topiary with your own hands, then using beads you can make a few more decorative hearts for decoration. But for the tree we definitely need to make leaves; for this we will use the French bead weaving technique. The same technique is used to make leaves when weaving flowers.
Beads need to be collected onto the wire, and then you can make the first turn: you need to step back about 10 cm from the edge, for the first turn you will need 15 beads. Each turn is secured by twisting on the wire. The loop will be three increasing turns, then you need to indent a few centimeters and repeat the same steps. Using this weaving technique, you need to make more than five leaves, step back another 10 cm from the edge of the last leaf and cut the wire. Large outer loops need to be sharpened; such leaves will turn out nice and very natural.
DIY coffee bean tree
When you have made several leaf blanks, you can start assembling - you need to twist the wire from the central one, so you will form a twig. At the end, the wire also needs to be twisted another 3-4 cm, and the leaves on the branch should be straightened in a chaotic manner. As a result, you should end up with 15 branches - this is a task for several evenings, so you need to start completing this gift in advance in order to be sure to meet the deadline.
Next, we have to make the sepals for our coffee tree; we will use the French axial weaving technique, in other words, arching. The technique is very simple, and even if you have not done beadwork before, you can master it quickly enough. First you need to leave an axis - 10 cm of wire with 15 beads. Using a string of brown beads, you need to weave arcs around the axis. The axis is braided at the top, then we return down. In each arc it is necessary to increase the number of beads. There should be five arcs in total on the leaflet. The workpiece should have an end of 30 cm of wire. You need to string amber beads onto this segment and form a sixth arc.
We continue to make a coffee tree with our own hands; the photo master class will tell you how to form a trunk from individual pieces. We need to attach the blanks to a wire with a diameter of about one and a half centimeters. To do this, you will need a 20 cm piece of wire. You can use nylon thread for fastening. Three finished pieces must be folded into a large branch.
The barrel frame can be made of aluminum wire, because it bends easily, but it is quite difficult to break it. Since on one side we will fasten the trunk in a pot, in this case in a bowl, then on one side we should make a loop.
You can add decorative coins to this craft, and as a result you will get an original money tree with your own hands.
DIY coffee tree: master class
Now we will assemble a coffee tree with our own hands, the master class will show step by step where to start: from the top you need to step back 5 cm from the edge and attach the first sepals. The remaining leaves must be attached to the base using a nylon thread, moving in a spiral.
Next, you need to decorate the finished tree: first, glue the bowl to the saucer, you can use PVA for this. Leave them motionless until completely dry. In a bowl or disposable glass, dilute the plaster so that its consistency resembles sour cream. Then you need to place the barrel in the center of the bowl and fill it with plaster; a little plaster should also be “spilled” onto the bowl and saucer, creating the impression that coffee has been spilled. This coffee cup will decorate your home interior and fill the room with a unique aroma.
The branches of the tree should also be plastered; for this you need to prepare a light solution: dilute the plaster with water and add PVA glue. The consistency of the solution in this case should resemble liquid sour cream.
When the crown is ready, you can attach the coffee ball. Then proceed to additional decoration to make our coffee tree look very beautiful with your own hands, the photo will tell you step by step how to paint the trunk with brown paint. We used ordinary paint - gouache, which must first be diluted with water and stirred thoroughly. When the paint is completely dry, you can begin shading the relief; for this you will need a dry, hard brush and white gouache. The brush should be made horizontal movements along the trunk.
The saucer and bowl can also be decorated using beans and ground coffee. And finally, coat the finished product with aerosol car varnish so that all elements are securely fixed and not subject to the influence of external factors.
A craftsman can make a coffee tree with his own hands by combining a variety of techniques and materials, for example, you can use the technique of creating bonsai and make a tree from coffee beans, natural stones and decorative coins. A money tree with coins is designed to bring wealth and good luck, so you simply cannot find a better gift for a friend.
DIY coffee tree: step by step
You can be sure that a coffee tree with your own hands will perfectly complement the interior; you can find photos of a variety of options for making such topiary on our website. Almost all trees with coffee beans have a spherical base, covered with beans, with an attached wooden trunk, which is finally fixed in a decorative pot with a plaster mixture.
Each topiary has distinctive features that lie in the elements of additional decor.
You are probably wondering how to make a spherical base, because not all stores can buy a foam ball, so needlewomen prefer to make it from scrap materials. For example, there is the simplest option - roll up a ball from newspaper sheets or foil, and at the end wrap it with twine or rope. For an “airy” topiary, you can make a hollow base using a balloon, thread and PVA glue. Using the same technique, you can make various children's crafts and Christmas tree decorations: first you need to inflate the balloon to the required size, carefully soak the selected threads with PVA glue and wrap them in a chaotic manner around the ball. Leave it until completely dry, and then carefully pierce the ball. When it deflates, you can take it out from the inside, and use the finished ball to decorate with coffee beans.
The most common combination is coffee beans with jute rope; it can be used to decorate the trunk of a tree and a pot; its natural texture will emphasize the “coffee” mood.
What can it be made from?
What will it take to make such a gift? In fact, you need a minimum of materials, patience and the desire to make it yourself. And, of course, some free time.
It’s not difficult to make such a topiary with your own hands.
The main element of coffee topiary is, of course, coffee . Regular grain, not ground. If possible, we recommend purchasing an expensive and high-quality option, where each grain is evenly roasted and emits a charming aroma that many people love so much. Coffee beans can be glued either whole or split in half, depending on the desired effect.
Coffee topiary in the form of a wallet
You will also need a base for the crown . The most popular is round, but often topiaries are made in the shape of a heart, cone, and so on. You can take a blank made of polystyrene foam, cardboard, or plastic, make it yourself, that is, cut it out, or buy it ready-made in stores that sell craft supplies.
Heart-shaped crown
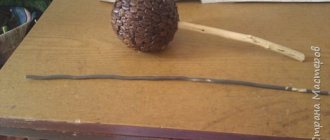
You will also need a stick, a tube , which will symbolize the trunk of the coffee tree. We will need to “plant” our crown on it. It is desirable that it be a fairly dense piece that can easily withstand the weight of the crown with coffee.
The trunk of the coffee tree should be quite dense
Threads or jute will also come in handy. They decorate the topiary trunk, imitating the bark of a tree. By the way, these materials can be replaced with beautiful satin ribbons.
Jute
You will also need a container in which our topiary will grow. It can be a small flower pot, a beautiful box, an old cup, a vase - anything according to your taste and desire.
Alabaster or gypsum will replace the soil in the container for the tree. We will fill the flowerpots with them and strengthen the topiary trunk inside.
Alabaster
a glue gun with special sticks is best suited for this task . It’s easier, faster and more convenient for them to work. And the coffee beans on the workpiece will hold firmly and will not fall off.
Thermal gun with rods
Varnish and paint can be useful to give the finished topiary gloss and desired shades. But, on the other hand, we do not recommend using them, as they will ruin the entire coffee aroma emitted by the craft.
Christmas trees made from coffee beans
For additional decoration of the coffee tree, you can use a variety of elements: ribbons, beads, flowers, dried natural materials and much more. You can fix them on the crown of the topiary using double-sided tape or the same glue gun.
And, of course, you will need a little imagination. There are a great many examples of ready-made topiaries on the Internet, but you can come up with something of your own.
Coffee topiary in the form of a floating mug
Coffee heart in a mug
The technology for making topiary from coffee is always the same. Only the crown shape, size and decor of the product change. In the master classes below we will show how to quickly and easily make a coffee tree.
Topiary made from coffee beans. Master class with photos
DIY topiary made from coffee beans. Master Class
Master class with step-by-step photos “Topiary from coffee beans”
This master class is intended for middle-aged and older children, additional education teachers, educators and all those who love to be creative and create masterpieces with their own hands. Purpose: coffee topiary is a wonderful decoration for the interior of an apartment, an original hand-made gift for loved ones. Completed by: Lapteva Svetlana Khristyanovna, teacher of the state budgetary institution of the Novosibirsk region “Social Rehabilitation Center for Minors”, Tatarsk Purpose: making topiary from coffee beans. Objectives: - teach the technology of making topiary; - instill labor and accuracy skills; - develop aesthetic taste. Coffee beans are by far the most popular material for creating topiary. They look quite chic, bring happiness to the home, and have a unique coffee aroma that creates an atmosphere of warmth and comfort.
Making topiary from coffee beans is not at all as difficult as it might seem at first glance. If you have ever made a miniature tree, then you will not have any difficulties, but if you decide to make it for the first time, then the step-by-step manufacturing process presented in the master class will definitely help you. To complete the work you need: - coffee beans; - newspapers; - sewing threads; - PVA glue; - scissors; — construction gypsum; - a small disposable cup; - cup; - burlap; - leg-split; - glue gun; - wire; - toilet paper; - pliers; - wand. Let's begin the work by making the topiary crown. It consists of a ball and a barrel. We make a ball from newspapers and sewing threads. We crumple the newspaper, giving it a round shape. We rewind each layer of newspaper with threads, constantly leveling it and giving it the shape of a ball. The diameter of the ball should be approximately 12-13 cm. Tear the paper into pieces and cover the ball. We do this to make the surface of the ball more even. This is what the ball should look like after covering it with paper. We make a cross-shaped cut on the ball, a tree trunk will be inserted into it.
Add a little coffee to the PVA glue and coat the ball with the resulting brown glue so that it is the same color as the coffee beans, in this case there will be no “holes” or unwanted gaps on the product. When we glue the grains, the base will be visible, therefore, by painting it to match the coffee, the base will not show through so much. Give it time to dry thoroughly. Let's start making the barrel. We take the wire, fold it several times, since it is thin, and give it the shape of a snake. Take a strip of paper, fold it lengthwise into three layers and wrap it around the snake.
Having wrapped the snake completely along its entire length, lubricate it well with PVA glue and let it dry. This is done to make the snake more rigid.
We try on the resulting stem and determine the height. If necessary, the barrel can be shortened. We wrap the trunk with twine. This is what a snake barrel looks like.
Take a stick and wrap it with twine.
Straight trunk of topiary.
Assembling a tree trunk. We insert the straight stem into the middle of the snake. This is what the design should look like.
We insert a tree trunk into the cut of the ball. If necessary, secure with a glue gun around the barrel. In a disposable cup, dilute the plaster with water to a creamy consistency and fix the crown in it.
Let's move on to the most interesting and painstaking task - gluing the grains. We will glue it using a glue gun. We select grains that are even and identical in size. We try to glue grain to grain. Coffee beans should be placed as close to each other as possible. If you can't do this with your fingers, use small tongs.
This is what happened.
We look where the base is visible and glue the second layer of coffee beans. When the second layer of grains is glued, the surface texture will become more interesting, more prominent, and the tree itself will look more noble. Having completed the design of the crown with grains, the tree can be “planted” in a pot. We use an ordinary simple glass as a pot. Take a piece of burlap 4cm wide and glue it along the edge on the inside of the glass. Fold the burlap down.
Apply glue to the bottom of the glass using a glue gun, and glue our topiary to the bottom of the glass. Pour coffee beans into the free space of the glass. Let's decorate the topiary with a decorative element. Take a piece of burlap 10 cm long and 3 cm wide. We pull the threads from the middle of the strip.
Fold the blank in half and make a stitch.
We tighten the threads and form a flower. We take 10 threads that were pulled out of the burlap, tie them into a bundle, and make them of different lengths.
Using a glue gun, glue the coffee beans to the threads. Glue the two grains together by inserting a burlap thread between them.
This brush with grains turned out after gluing. We insert the blank into the middle of the flower. Glue three coffee beans onto the flower. Glue the decorative element to the crown of the tree. The result of our work.
Topiary design options.
We recommend watching:
DIY coffee heart topiary. Master class DIY sunflower topiary. Master class Topiary made from coffee beans. Master class with step-by-step photos Male coffee topiary. Step-by-step instructions with photos
Similar articles:
DIY topiary made from coffee beans. Master Class
DIY coffee bean figurines
DIY horseshoe made from coffee beans
DIY Christmas tree of happiness
Option #1. Topiary in an old mug
Let's see how to make a simple coffee topiary in an old mug. To do this, we need a ball base, coffee, twine, plaster or construction alabaster, satin ribbon, sisal, paper napkins and regular PVA, a metal or wooden stick, a glue gun and, of course, a regular old mug that suits the style.
What you need to create a coffee topiary
Step 1 . Take the finished foam ball and make a hole on one side. Fill it with glue and insert the future tree trunk there.
Future tree trunk inserted
Step 2 . Tear regular paper napkins and cover the surface of the ball with them using PVA glue.
Torn paper napkins
The ball is covered with napkins
Step 3 . Be sure to dry the base covered with napkins thoroughly. PVA dries quickly, so this process does not require much time.
PVA glue dries quickly
Step 4 . Next, it is recommended to paint the base with dark paint so that there are no white areas between the coffee beans in the future. After painting, dry the paint layer. If desired, you can use colored brown napkins so as not to interrupt the aroma of coffee with the smell of paint.
Prepared base
Step 5 . The next stage is the decoration of the trunk. In its upper part, fix the twine with glue and then simply wrap it tightly around the tree trunk, periodically gluing the layers. If wood or, for example, a bamboo stick is used as the base, then it does not need to be decorated with twine.
The trunk is wrapped with rope
Step 6 . Now you can start covering the ball with coffee beans. Glue each one with glue from a glue gun. When you finish gluing the first layer, we recommend making a second layer of coffee - then the topiary will look more magnificent, and in this way you can also close the gaps between the grains of the first layer.
Gluing coffee beans
The ball is covered with coffee beans
Step 7 . Mix alabaster into a mug-pot or place plaster there. The mass should be thick enough to hold the trunk and crown of the tree inside. Place it there and fix it in the desired position until the alabaster hardens.
The mass should be thick enough
The barrel is placed in a cup-cup
Step 8 . Once the “soil” in the pot has hardened, cover it with sisal as a decoration.
Sisal as decoration
Step 9 . And you can tie a satin ribbon on the trunk of the tree for decoration.
Satin ribbon bow
Topiary made from coffee beans in an old mug
This is the kind of topiary you can get in just a couple of hours of work. It will be a wonderful gift for a person of any gender!
What you need for work
To make topiary from coffee beans with your own hands, we will need:
Important. When choosing, focus on the quality of the material, and not on the degree of roasting. Only smooth and solid samples are suitable. The size is also not important: both large and small ones will be used.
- bean coffee approximately 250 grams, it all depends on your imagination;
- the base is a ball. Beginners prefer polystyrene foam (you can buy it in hobby hypermarkets). Another type of frame is a plastic hollow ball, or papier-mâché. Choose a ball of small diameters - 10-15 cm - small ones are difficult to work with, large ones are difficult to balance;
- twig, real, possibly curved, about 20 cm in length;
- glue gun;
- brown acrylic paint;
- plaster or alabaster to “plant” the coffee topiary;
- lace, rope, braid;
- small objects: beads, flowers, butterflies, etc.;
- small flower pot or clay mug;
- brush.
Option #2. Coffee bean tree (heart shaped topiary)
You need to cut out 2 hearts from cardboard, wrap the wire in paper
Glued cotton pads are wrapped with thread, painting
The grains are glued, the jar is covered with ice cream sticks
The wires are wrapped with jute thread, the finishing decor is topiary
Materials for creating a coffee tree “Spices of the East”
- Ceramic cup - height 7 cm.
- Curved branch of corilus - length 20 cm.
- Plasticine for fixing the barrel.
- Construction plaster and water - only 150 grams of solution.
- Weed in a pot (fluffed twine) - 2 m.
- Chocolate felt - 1 sheet of A5 format.
- Cinnamon sticks - 2 pcs.
- Whole coffee beans - 100 grams.
- Foam ball - d=8 cm.
- PVA glue, brush Acrylic - antique bronze and chocolate (brown color).
- Satin bow with polka dots - 1 pc.
- Pasta - bows and stars.
- Dried citrus slices - 3 pcs.
- Bay leaf, peppercorns - 1 pack each.
- Salted dough medallion, decorative snail - 1 pc.
- Paper twine or string to wrap around cinnamon sticks.
- Cloves, cardamom, dried peas.
- Yellow corn and whole orange seeds.
using a hot-melt gun for gluing work . Unlike liquid glue, it is convenient, economical and significantly reduces the time it takes to make a coffee tree.
See also: Topiary made from Garden of Eden coffee with alder cones and delicate foamiran roses and doves in a sisal nest! ✔ Go to the master class with photos and videos .
Option #3. DIY topiary man
In this section, we suggest that you familiarize yourself with the process of creating an original topiary in the shape of a man. For this you will need the same materials as above, but we will replace the paint with knitting threads, and you will also need some wire and a decorative flower. Here, wire can be used as a trunk, then a stick as a trunk will not be needed. But we still use a regular wooden skewer.
Materials and tools for topiary man
For decoration you will also need red, white and green satin ribbons. Our topiary will also wear a hat, which we will make from cardboard.
Step 1 . Dilute the building plaster so that it is thick enough and fill it with the container in which our topiary will sit.
Wooden skewer inserted into plaster
Step 2 . Place a thin wooden skewer in the middle of the container with plaster and fix it in one position until the plaster hardens completely.
Fix the skewer until the plaster hardens
Step 3 . While the plaster hardens, start creating the crown-head of the topiary. Wrap a round foam ball tightly with regular chocolate-colored knitting threads, replacing the napkins and paint from the previous master class with them.
The ball is wrapped with knitting threads
Step 4 . Cover the ball wrapped in thread with coffee beans using the same glue gun.
The grains stick to the ball
Step 5 . Use the wire to form two handles for the topiary man. You can do it directly with your fingers.
Wire handles
Step 6 . Using satin ribbons and a glue gun, decorate the wire handles by making sleeves and gloves for the man.
Made sleeves and gloves
Step 7 . Now fix the finished handles on the topiary skewer using wire. And wrap the junction of these elements with black satin ribbon.
Connections are wrapped with tape
Step 8 . Wrap the same tape around the trunk of the tree. And near the handles, use glue to attach a white butterfly bow made from ribbon.
White butterfly glued
Step 9 . Next, let's start making a bouquet - what kind of gentleman would be without it? Twist the flower stem from the wire.
Wire flower stem
Step 10 . Attach a regular artificial flower to the top of the stem, and wrap the stem itself with green satin ribbon.
The flower for the man is ready
Step 11 . Carefully secure the flower in the handle of the topiary man.
Flower fixed in hand
Step 12 . Make blanks for a hat for a man out of cardboard. Cut out round fields, as well as a circle and a rectangle to make the crown.
Cardboard blanks for hats
Step 13 . Wrap the brim of the hat with a black satin ribbon, securing it with a glue gun.
The fields are wrapped with black tape
Step 14 . Cover the elements of the crown of the hat with the same black tape.
The hat details are ready
Step 15 . Assemble a topiary hat from individual ready-made elements, connecting its parts to each other with glue.
Topiary hat assembled
Step 16 . Glue or simply place the hat on the topiary.
The man has a headdress
Step 17 . Decorate the plaster or alabaster in a cup with coffee beans on top, gluing them with a glue gun.
Coffee beans glued to plaster
The topiary is ready. This kind of gentleman can decorate a desk or shelf in an apartment. And if instead of a stick you use wire to make the trunk, then you can make a flexible “body” of the topiary, which can be beautifully bent into an original “bow”.
Such a gentleman will be a great decoration- You can make a flexible “body” for a man
How to make a multi-crown coffee bean tree
You can make a Tree of Happiness from coffee beans with several crowns. This tree looks more intricate and richer. And it’s not much more complicated than the first one.
1) Wrap six balls of any material with woolen thread and secure the ends with glue.
2) Cover the surface of the balls with coffee beans, smooth side up. Leave a small space clear for attaching to the barrel.
3) We make a tree trunk from double aluminum wire, bending it in different directions. We connect the pieces of wire with a strong cord or masking tape. You should end up with six curved branches. We cut their ends into two parts, and twist the base into a ring.
4) We wrap the entire trunk with masking tape, making the trunk thicker downward. We wrap a coarse twine over the tape.
5) We strip the ends of the wire from the braid.
6) The balls are glued to the barrel.
7) The trunk itself is filled with plaster in the selected stand. After drying, the surface of the gypsum is also covered with grains.
It is better to choose a stand for such a topiary from flower pots. The imitation of a bonsai plant with such a base will be more obvious.
Video tutorial on making coffee topiary
The video presents a master class on making topiary in the form of a tree in a cup. The description is given above. But it's better to see than to hear.
The crown is made from a foam ball wrapped in thread and covered with coffee beans. The trunk of the tree is made from a slightly curved pipe; it is decorated with coarse natural thread.
The slight curvature of the trunk gives the topiary a romantic look. The plaster base in the pot is decorated with coffee beans. The work on the craft is completed with a transparent organza bow.
Video master class – Topiary “Heart” made from coffee
A video of a master class on making coffee tree in a transparent glass mug shows the stages of work. Coffee beans, natural twine and white pebbles are used.
The heart-shaped crown is made of cardboard. The trunk is wrapped with a thick layer of twine. The mug is filled with liquid plaster and the finished tree is inserted into it. The result is a white glass pot-stand. The mug is additionally decorated with coffee beans and braids of woven twine, and the surface of the plaster is covered with white stones.
Option number 4. DIY heart topiary
Now let's see how you can make a light topiary heart. Here you will need a large number of white and pink flowers, gold, white and brown acrylic paint and, of course, a blank for a heart-shaped crown.
Step 1 . You can buy flowers for topiary decoration or make them yourself. In the latter case, we recommend using pink ceramic plastic, which dries quickly. Create flowers from it and let them dry.
Flowers can be made from pink ceramic plastic
Creating flowers for decoration
Step 2 . Next, paint the heart-shaped blank for the crown with brown paint and then use a glue gun to glue the coffee beans to it. Before this, attach the stick-trunk to the base.
Coffee beans are glued to the workpiece
Photo of the work process
Step 3 . Then paint the coffee heart with a coat of gold acrylic paint.
Applying acrylic gold paint
Step 4 . Now shade the gold with brown acrylic. Use a sponge sponge: put a little paint on it and blot the base with it.
Brown acrylic shading
Step 5 . Next, using the same technique as in step 4, shade the topiary with white acrylic paint.
The same, but using white paint
Step 6 . Paint the trunk of the tree with white paint.
Painting the barrel
Step 7 . Now use a glue gun to decorate the topiary itself. Use flowers, beads, ribbons.
Decorating topiary
Step 8 . Our topiary will sit in a white cup, which can also be decorated - for example, with a pink lace ribbon.
The cup is decorated with lace ribbon
Step 9 . Next, mix a thick gypsum solution and pour it into a topiary pot.
Gypsum solution poured
Step 10 . Place the topiary in plaster and fix it until the solution dries completely.
Topiary is installed in plaster
Step 11 . Decorate the base in the cup with pink sisal, padding, feathers and flowers.
Base decoration
Step 12 . Additionally, you can decorate the topiary itself with original white wings.
Beautiful white wings
This beautiful and very delicate product can be an excellent gift for a couple in love on their wedding day or will decorate their home for Valentine's Day.
This topiary can be a great gift.
Original ideas for topiary
Don't be afraid to experiment and use your own imagination when making a coffee tree. There are many different variations of topiary, here are some stylish ideas for crafts.
Classical
Traditional coffee topiary has a round shape. There are no special decorations here; it is best if the craft is made in soothing shades using natural materials. This is a simple and truly elegant option that is suitable for interior decoration in different styles.
Valentine's card
A heart-shaped topiary can be given as a surprise on February 14th. The base is sold in stores with floral materials, but you can also make it yourself using available materials.
"Flying" cup
Crafts like these seem incredibly complicated, but they are quite easy to make yourself. To do this, you will need a piece of wire, a glue gun or a can of polyurethane foam.
Tree with flowers
A tree with delicate flowers will be a wonderful surprise for a gift on March 8, birthday, etc. In addition, such a topiary can be placed in the living room or bedroom.
With birds and butterflies
Imagine a stylish tree with dragonflies, butterflies or birds sitting on it. This craft looks truly spring and reminds you of warm days, regardless of the weather outside.
fruit tree
Decorate the craft with dried fruit slices, for example, citrus fruits, the result will be a wonderful decorative item for the summer table. However, such topiary can easily be complemented with New Year’s table setting.
Money Tree
A coffee “money” tree is a good surprise option for men. It can be made in the same way as an ordinary topiary, the only difference is that the ball needs to be covered with coins, then zipped around them and finally covered with coffee beans.
New Year
A topiary in the shape of a Christmas tree will be a wonderful table decoration during the holidays, and will also complement the homely New Year's atmosphere. You can buy the base blank additionally or make it yourself. To do this, just roll the cardboard into a cone and trim off the excess pieces.
Double and triple
This craft requires more time, but the result is a really beautiful topiary. Several crowns develop from one stem or “grow” from two or three trunks at once, which may have different thicknesses and heights.
Ball
This is not exactly topiary, but a coffee ball is made in a similar way. The difference is the absence of a trunk, and in shape it will not at all resemble a tree. You can combine coffee beans with seeds and legumes in a composition. A stylish option can be achieved by placing several balls in a beautiful glass dish or vase.
If you like to surprise and delight your friends with non-standard gifts, you will definitely like this type of craft like coffee topiary. After all, all that is required to create it is simple devices and materials, accuracy and patience. Well, a drop of inspiration, of course!