A cup of coffee with a pattern on milk foam is a signature feature of many coffee shops and cafes. For the establishment, this is a way to attract new visitors; for the barista, it is an opportunity to show their imagination and creativity.
Doing something like this at home for someone who has not undergone special training and does not have the same technical capabilities as a professional barista is not easy, but you have to try.
If successful, you will present your loved one not just “coffee in bed” (although this is already great), but confirmation of sincere feelings, if it is, for example, a cup with the inscription “I love you” on the foam or a drawing of a heart.
By the way, we talked about who a barista is in a separate article.
What is latte art
Latte art is the art of drawing certain images on coffee foam. This original idea came from Italian monks. True, not many people remember this now. Creating beautiful patterns and original inscriptions on the surface of the drink has already begun in all corners of the planet.
Coffee art is an opportunity to show your imagination. Certain coffee shops even offer a unique service.
The visitor shows a photo on his smartphone, it is transferred to the coffee machine, and this image is reproduced on the latte or cappuccino.
How to draw latte art on coffee foam?
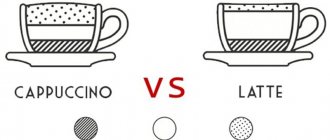
First, let’s figure out what kind of coffee baristas use to draw artistic compositions. Most often, masters use cappuccino, which is prepared by adding milk with thick foam to espresso in a ratio of 1 to 3. Depending on the pattern and the method of creating it, grated chocolate, cinnamon and other ingredients can be added to the cup.
For drawing, the most common choice is full-fat milk with a high content of cream, which gives it a unique taste. However, high fat content is not a necessary requirement - good foam can be obtained by whipping skim, baked and even soy milk.
But the processing method at the factory is really important. Modern industry offers two types of products - traditionally pasteurized and sterilized (ultra-pasteurized). Pasteurization involves heating to 60 °C for an hour. During ultra-pasteurization, the product is briefly heated to 120 °C and immediately cooled. Thanks to this, the shelf life increases from 10 days to six months, but the product partially loses its original structure. That's why pasteurized milk is used for latte art.
Foaming is done using hot steam, which the barista should always have in abundance. The result should be a thick and viscous drink, reminiscent of melted ice cream in consistency. At home, you can do without a coffee maker with a steamer. A French press works well for whipping. Using this tool you can create a product that is quite suitable for drawing.
Another important condition is the temperature of the cappuccino. It should not exceed 60 °C, otherwise the milk protein will begin to break down and precipitate. In addition, at high temperatures, carbon compounds degrade, causing the taste of the drink to turn from pleasantly sweet to bitter. So, if you want to drink something hot, it is better to take plain black coffee.
Latte art technique
Now let's look at the most important question - how to make a beautiful design on coffee foam? To create artistic compositions, a metal cup with a spout is used - a pitcher, also called a milk jug. The master may also need other tools for latte art: a pastry syringe, thin nozzles for it, sticks of different shapes and lengths, with the help of which the drawing is adjusted.
The first stage involves mixing milk, espresso and foam. To do this, the cup is tilted until a fairly deep place appears. The milk and foam must be thrown exactly into the deepest point. The master's main task is to carefully break the surface of the coffee and prevent it from ricocheting off the bottom of the cup. If everything is done correctly, natural mixing of the components will occur. You may not be able to perform this operation the first time, so before demonstrating your newly acquired skills to someone, practice well.
Next, repeated mixing is carried out, called “swing”. During this procedure, the latte artist moves the pitcher over the cup, slowly pouring milk until the drink is finally ready for further drawing. And finally, the last step is to create the image. There are many techniques for painting on coffee foam that are worth considering in more detail.
Secrets of drawing for black coffee
The drawings are created on dense milk foam. Only in this case will it be possible to make the perfect decoration. However, if desired, you can apply the pattern to espresso. Drawing on coffee is not difficult.
The easiest way is to create a base. The surface of the drink is sprinkled with cocoa powder. Pour it into a cup in an even layer using a strainer or salt shaker.
Cinnamon can be used as a base. Against its background, the drawing will be contrasting and bright.
What about the taste itself?
Can the design in a cup affect the taste of coffee? Definitely capable. And what’s most interesting is that with the same amount and ratio (espresso-milk-foam), coffee without a pattern will feel more balanced than the same coffee, but with a pattern. Latte art has a significant impact on the taste of the first sip. The larger the pattern on the surface of the coffee, the milkier it feels. This is perfectly demonstrated by a drawing such as a “heart”. Its size is easy to control by adjusting and playing with the balance of the first sip.
And of course, we shouldn’t forget about the subjectivity of taste. Our brain is capable of producing truly inexplicable things; our taste can change simply according to our mood. And even a definitely not tasty cappuccino with an uplifting beautiful design will seem to you the best you have ever tried.
Techniques for painting on milk foam
They make drawings on coffee using different techniques. Typically, the following are used:
- pitching. When applying this method, a pitcher is used. This is a kind of jug, equipped with a sharp spout. In this case, the foam is poured into the coffee, and the selected image is immediately drawn on it;
- etching. This technique involves using a sharp, thin stick. For example, you can take a toothpick. It is immersed through the foam so that the tip comes into contact with the coffee. After this, an image is applied by combining milk foam and espresso;
- mixed media . In this case, two methods are used at once: etching and pitching;
- stencil method. The method is considered the simplest. It is with its use that it is recommended to begin mastering the art of latte art. In this case, you need to buy or make a stencil yourself, which is then applied to the cup. In this case, the surface is sprinkled with grated chocolate, cocoa or cinnamon;
- volumetric technique. When used, it is possible to create three-dimensional images from thick foam;
- engraving. The method involves the use of syrup. With its help, an image is created on the surface or an inscription is made.
Etching
Pitching
Stencils
Volumetric drawing
How to make drawings on coffee
Whatever drawing technique the master chooses, the first thing he does is prepare an invigorating, high-quality espresso or cappuccino in a coffee machine. The drink is poured into a cup or glass (as you like) and sprinkled with chocolate, cocoa powder or cinnamon on top. Thanks to these ingredients, the drawing will turn out to be especially interesting and expressive.
Then milk foam is prepared. Cream (30 percent fat content) or milk (fat content percentage of at least 3-3.5) is best suited for this purpose. The foam preparation technology involves the use of a chilled product , which is then heated to the required temperature and at the same time whipped under pressure.
The whipping process, according to experts, should not be too long, because its goal is to achieve a slight thickening of the product . To simplify the task, in addition to coffee machines, a special jug for milk (pitcher) is provided; use it like this:
- fill the pitcher with milk just below the base of its spout;
- the steam tap of the coffee machine is lowered into the pitcher so that the holes in the tip are a centimeter and a half below the milk level;
- the steam tap of the coffee machine is opened;
- the milk will increase in volume, therefore, in order to maintain a distance of one and a half centimeters, the tip of the tap will also need to be raised up, the duration of whipping in different coffee machines is from 5 to 15 seconds;
- the same amount of time will be required for the procedure called steaming milk - the tip is immersed deep into the pitcher, and 1-1.5 cm now separates it from the bottom, and not from the surface (the jug will have to be slightly tilted so that vortex processes occur in it more actively);
- in 5-15 minutes. the steam tap is closed, the milk at this point warms up to a temperature of 65-70 degrees;
- You can start drawing patterns on the coffee surface using the pitcher’s nose as a “pencil.”
For a beginner, this will be quite difficult to do, but experienced baristas are able to achieve the desired result in different ways:
- placing the pitcher at different heights from the cup (thus changing the strength of the jet);
- adjusting the speed of the jet;
- selecting various points on the coffee surface and directing the jet at them.
To apply patterns, various thin and sharp sticks such as toothpicks are used. They are lowered into the coffee to the required depth, and then lifted, grabbing a little coffee and bringing it to a snow-white surface, and a light dark touch, geometric lines, zigzags, ovals, flowers are applied to it.
To create original coffee pictures, a pastry syringe with a thin nozzle is also suitable; it is filled with liquid chocolate or thick syrup (caramel, strawberry, chocolate) and patterns are created directly on top of the milk foam.
If you don’t get the perfect picture, it’s better to start by mastering a simpler method of drawing - using a stencil, buying a ready-made one, or cutting it out yourself from cardboard. The stencils should be slightly wider in diameter than the cup or mug, but the design should not extend beyond its limits.
If you are making your own stencil, try not to make the slits too thick - this will make the image look more elegant. The stencil is placed over a cup, the surface of which is covered with milk foam, and grated chocolate, cinnamon, and ground nuts are poured onto it. On the dark surface of the espresso it will be interesting to look at an image made of powdered sugar - for example, a swan, a bunny, a deer.
Essential Drawing Tools
When planning to draw on coffee, you must first prepare all the necessary tools. During the work process you may need the following:
- pitcher It is considered the main one among the instruments. It is designed to froth milk manually. In addition, it will act as a kind of pencil;
- salt shaker It is filled with cocoa, which is necessary to create an image on espresso;
- wooden sticks . They are used when making thin lines;
- cream injector. Used when outlining contours. It can be replaced with a tube with a thin tip or a ready-made can filled with liquid chocolate.
Ideas for Beginners
It is quite possible to master the art of latte art at home. At the same time, it is not at all necessary to start with complex patterns. Initially, it is recommended to learn how to create simple pictures. For example, draw a heart or a star.
Lesson 1: heart
To make a heart using the latte art technique, you need to perform the following manipulations:
- Place the milk in the refrigerator in advance and cool it to the desired temperature.
- Froth the milk product in a pitcher using the steamer of a coffee machine.
- Brew espresso using any convenient method.
- Sprinkle the surface of the prepared drink with cocoa powder.
- Take the pitcher in your hands and tilt it over the cup.
- Pour in the frothed milk strictly in the center. In this case, the pitcher should be kept at a distance of 5 cm from the cup.
- When the white circle on the surface is the right size, the pitcher's nose should be moved to the place where the heart will have a depression.
- The spout should be slightly closer to the coffee. It should be approximately 2 cm away.
- Now you need to quickly cross out the diameter of the milk circle. You should start from the place where the depression should be, and end at the sharp part.
This is where the work ends. Thanks to the drawn line, the last drop will pull the image to the side and you will get a heart.
Lesson 2: bunny
Making a bunny drawing is no less simple. During the work you only need to perform a few manipulations:
- By using a pitcher, make a circle in the center and form a heart above it, as mentioned above.
- Use a toothpick to make the bunny's eyes and nose.
- Then draw the mustache and mouth.
This creates a funny bunny face with heart-shaped ears.
Lesson 3: star
Even beginners in the art of latte art can create an image of a star on the foam. In this case, you only need to perform a few steps:
- Pour milk from the pitcher into the center of the cup, thus forming a small circle.
- The resulting white figure should be outlined with chocolate icing. A pastry syringe is used for this purpose.
- After this, another chocolate rim is made. It should be larger in diameter than the first one.
- Using a toothpick, draw lines from the center of the circle to the edges of the cup. The more such strokes are made, the more rays the star will have.
Drawing chocolate flowers on latte
Prepare chilled dairy product. We foam it with the help of a coffee machine, due to the action of a steam engine. Pour milk into tall serving glasses. Take a teaspoon of foam and set it aside.
We brew espresso. To make a cocktail with proportions 1:3. More milk, less coffee. Pour espresso into the frothed milk product.
This needs to be done in the center. If done correctly, a brown spot will form there.
Place the reserved foam on this spot. Using liquid chocolate, we make an outline of the brown spot and a foam outline in the center of this spot. You should get chocolate rings. There are two of them. Now, with the tip of a wooden stick, we begin to draw lines from these rings to the edges of the dishes.
The shapes of the flowers change if lines are drawn from two rings separately. First, draw lines from the coffee stain. Then, the lines from the foam. Or you can combine the lines into one. The video shows this in detail.
DIY coffee stencils
The easiest way to make drawings on coffee is to use stencils. You can make them yourself. To do this, you need to perform a number of simple manipulations:
- Draw or simply print a drawing.
- Attach the paper with the image to a thick base.
- Cut out the design using a utility knife, securing the cardboard with tape.
- Apply the resulting base to the cup, placing the image in the center.
- Trace along the outline.
- Make a small indent and cut out the workpiece.
Creating drawings on coffee foam is a fun activity. Absolutely anyone can master this technique. The main thing is to follow certain recommendations and be patient. Without any doubt, after a short time you will be able to achieve a high level of skill and create many new masterpieces.
Latte Art is another proof that coffee is a real art
When ordering a cup of cappuccino or latte, it is always nice to receive not just a high-quality drink, but some kind of design on it. It makes you smile and really lifts your spirits. No less interesting is watching the barista who makes this drawing. The painting process is very similar to the work of an artist, where every movement and idea of the performer is important.
Photo: instagram.com/26_sverdlova
Sometimes the complexity of a drawing amazes and pleasantly surprises you when you see something unusual and new for yourself. This once again confirms the idea that coffee is an art. It’s not for nothing that most baristas are people who are directly or indirectly connected with creativity. Every day the guys try to move forward and come up with something new to please visitors and improve their skills. Drawings on coffee are like a dialogue between a visitor and a barista. It's always interesting to see people's reactions when they receive the drink. Such things add soul to the drink and the place where you buy it.
To understand the origins of Latte Art, you need to look into the distant past. The first drawings, like the latte drink itself, were invented in Italy. This country has a special relationship with coffee. At that time, baristas began serving cappuccino and lattes with simple designs: “flower,” “apple,” and “heart.” It was these patterns that became the basis for Latte Art. Also one of the popularizers of this art was David Schomer in the 80s-90s. He developed the culture of drawing on coffee in the USA, wrote many articles and published the book “Espresso Coffee. A guide for professionals." All this contributed to the development of coffee culture as a whole.
David Schomer
The main secrets when applying a design to coffee are high-quality coffee, the skill and imagination of the barista, and milk foam. Considering the Latte Art technique itself, we can distinguish several main types of drawing:
- Pouring milk froth into thick espresso is a very simple and practical way to create patterns on the surface of coffee. This technique is the most common nowadays because it produces a fast and durable pattern.
- Obtaining patterns on the surface of milk foam using an etching stick - patterns created in this way are less durable compared to pouring milk foam. Also used for painting caramel and food paints.
- Using Stencils – Coffee designs are created using a stencil and cinnamon or cocoa powder.
In the modern world, the art of drawing on coffee has become very popular. For many years, local and world-level Latte Art barista championships have been held. This encourages participants to come up with more complex designs, use colors and new techniques. So in the spring of 2021, we held the first Latte Art championship in Minsk. This was a very significant event for all the guys who are interested in or professionally involved in making coffee. All participants showed a high level of training and professionalism. This event was a good impetus and incentive for the further development of coffee culture in Belarus.
The winner of the Belarusian Latte Art Championship was Roman Lekhnovich (barista of the “26” coffee shop). He represented our country at the world championship in Budapest. This was a first for our country. And Roma showed a decent level. This proves once again that coffee culture in Belarus is gaining momentum and baristas are becoming truly professionals in their field.
Winner of the national championship Latte Art 2021 – Roman Lekhnovich, coffee shop “26”
To find out the secrets of Latte Art and impressions of the world championship from Roma, our coffenews.by team went to the “26” coffee shop.
Why did you start doing Latte Art? What attracted you to this art?
— Our team is trying to develop in all directions. Everyone supports and guides each other. And with Latte Art it all started a long time ago, when there was no “26” coffee shop. I really liked the glossy foam on the cappuccino and the fascinating designs on it. Latte Art is creativity, where the process depends only on you, your practice and patience. The first drawings came out quite easily. Latte Art started with basic patterns: “heart”, “rosetta” and “tulip”.
What gave the impetus for further development?
— Our national championship, which took place in April, was a big impetus. When the disciplines were announced, I chose Latte Art for myself. At that time I was doing well, but in order to win I needed new ideas. I started preparing in a couple of months. And I realized that it is the preparation for the championship that most stimulates and develops you as a professional. In general, I would like to try myself in other disciplines.
Tell us about the reaction of guests when you bring them coffee with a pattern? Do you often hear compliments?
— The reaction of the guests is obvious. People who drink cappuccino or flat white with us for the first time begin to smile and admire. You always try to come up with something new and interesting. Sometimes it becomes a shame when a drink sits for a long time until a bunch of photos are taken and it becomes covered in “bubbles.” Our guys sometimes joke so that I don’t do my drawings and the guests immediately start eating (laughs).
Share your Latte Art secrets? What needs to be done to get a good drawing?
— First you need to prepare a rich espresso, maybe double. Then the milk comes into play: it is important that it is not too fatty (no more than 3.2%, since fats still hide the taste of espresso from us) and sweet enough (carbohydrates are responsible for this). By the way, warm milk tastes sweeter than cold milk. It's quite simple: initially, the human tongue perceives sweetness better if the product is warm. This explains why cold soda is so refreshing, but when warm it seems cloyingly sweet.
Next, you need to properly aerate the milk (saturate it with oxygen). It is important not to overheat it and make it elastic, glossy, so that it stretches and flows well, without obvious bubbles naturally. And actually pour in the milk, distributing the coffee creams evenly on the surface of the cup to balance the flavor profile of the drink. There are also different spouts for pitchers, which allows you to adjust the flow strength and thickness of the jet. With some it is more convenient to put “dots”, with others “rosettas” and “lines”. Everything is individual and depends on what technique you want to use to make the drawing.
How do you get new drawings? How long does it take to work?
— Nowadays there are a lot of materials on coffee topics on Instagram, especially beautiful drawings on cappuccino. So that's where I mostly find my inspiration. It can take a lot of time to complete a drawing, it all depends on its complexity. But then it’s very nice to see the end result. When you repeat a drawing or make it even better.
Tell us a little about the championship? What is the world level of Latte Art?
— It was difficult for me because of the language barrier, which did not give me the opportunity to communicate with many participants, but Dasha Pinchuk was with us, who helped me with the translation. I’m already starting to improve my level of English, because next year the world championship will be held in Amsterdam. This is a good incentive. Of course, I watched a lot of videos before the trip from previous championships and imagined where I was going. But then I got to know it from the inside. This is a huge gathering of coffee people from all over the globe. A large exhibition where various equipment is presented, coffee machines, coffee grinders, roasters, various types of devices for brewing, green coffee.
There were also many cuppings from the Brazilian laurina to the Panamanian geisha for a thousand dollars. All this gave a lot of knowledge and inspiration for further development. The main things at the Latte Art Championship are the creativity of the drawing and a high level of complexity, for which they give the maximum number of points on the judge’s list. The championship takes place in several stages: one of the first is a performance in the “Art Bar” zone, you are given free rein to your fantasies and the technique of performance is lowered. Only the resulting drawing is evaluated. At this stage, you are allowed to use food coloring. If you combine colors beautifully, you will get a very effective design. It's not that difficult to do, you just need to practice. In normal coffee shop life, you don't use such things.
World Latte Art championship.
Are you going to participate in the championship next year?
- Yes. There are already several ideas for the next championship. I want to show myself again and give 150%. We all have room to strive and grow.
What advice would you give to guys who are just getting acquainted with Latte Art?
- You need to be inspired. It all depends on the product that you should admire, the team you work with, and the conditions created for your development. At 26 we always support and push each other to do something new. This creates the right atmosphere and allows you to work with pleasure.
TELL FRIENDS: