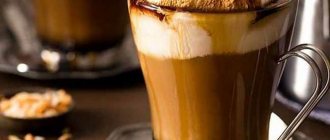
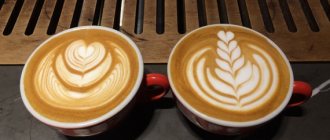
In many cafes, when you order a cappuccino or latte, they will serve it with a beautiful design. If the barista is in a hurry, it can be a simple heart, or a so-called rosette (rosetta), or a leaf drawn with white milk on the brownish-golden surface of the coffee. If you have free time and inspiration, the drawing can be quite complex and unusual, voluminous. This is a separate type of coffee art, and many are interested in the name of coffee with a pattern on the foam.
Coffee with a design on the foam is called latte, and the process itself is called latte art. Although now they can draw something interesting on a cappuccino, originally it was just a latte, a coffee cocktail in a beautiful glass, and the baristas tried to somehow decorate it additionally.
There are different methods of application, including automatic ones, using a special printer, but the ability to create drawings in the latte art style manually is much more valued. Syrups, cocoa and grated chocolate can also be used. We tell you all about drawings on coffee.
A little history of latte art
Initially, painting on coffee began in Italy, but it was the Americans who made such coffee popular throughout the world. Already in the late 1980s, most coffee shops served their visitors cups with painted rosettes and leaves, and in the early 2000s they conquered the whole world, including Europe and the countries of the post-Soviet space.
Today, Asian baristas are considered the best masters in the world, whose art receives constant awards at championships, and it is Asians who surprise the whole world with the help of social networks.
There are more than three million photos on Instagram using the hashtag #latteart, and top videos on Youtube receive more than five million views.
A beautiful presentation of the drink is very important for popularizing establishments, as visitors like to post photos with beautiful cups of coffee. Therefore, many establishments spare no expense and time in training their employees, and professionally, craftsmen who can quickly and confidently create unusual, original drawings on coffee are highly valued.
There are several basic techniques for making designs on milk cream foam.
Pitching technique.
The most complex and difficult to achieve method, in which baristas draw a stream of milk from the pitcher, making rotational or oscillating movements. The main elements of pitching are the heart, plant and fruit of the apple. Having mastered these elements, you can depict many derivatives.
Etching technique.
It is a continuation of pitching, in which, at the final stage, toothpicks and brushes are used to draw small details.
Mixed media
It is distinguished by the use of auxiliary products, for example chocolate icing from a pastry bag. Pictures are more expressive and clear.
Volumetric latte art technique.
Well, how to draw on coffee and ignore 3D technology? Japanese barista Kazuki Yamamoto raised this type of coffee art to the highest pedestal. Milk foam becomes a mini-sculpture under his skillful hands. Funny faces, cute cats and bear cubs, comic book characters look out of the cups. Often the characters strive to slip out of the container assigned to them, and a single composition takes up several cups.
Types of latte art designs
The most popular and famous drawings are, of course, the simplest. It is important to prepare the coffee correctly and froth the milk, and then practice pouring it with simple but precise movements. A blurry picture suggests that the barista often does not know how to prepare a good drink at all, since these are basic skills - well-frozen milk will form the right layers and streaks correctly.
Start learning with something simple:
- Heart. The most basic drawing, which is believed to be possible almost by accident, simply due to the characteristics of free pouring. First, milk is poured into the center of the cup from a greater distance so that it gets to the bottom, and when three-quarters of the foam has poured out, the pouring is slowed down, pouring the foam closer to the edges. Explaining the principle of infusion is more difficult than understanding it from simple training videos, of which there are so many on the Internet.
- Socket. Tilt the cup about 45 degrees and start pouring from a height so that the foam settles to the bottom, creating the base of the pattern. Next, bring the jug closer and slow down the pouring by rocking the pitcher jug from side to side. Don't rock the cup! We draw from the wide base to the thin upper leaves, then with a sharper movement we extend the stream to the base.
- Tulip. The principle is the same as in the rosette, the only difference is how exactly to draw the leaves and pour more foam into the upper area of the cup to create a flower head. We pour in portions, with each next speck, as if pushing away the previous one, which will spread.
- Twig. Pour foam into the bottom, we need a dense base on which the pattern will lie. Next, carefully pour in at least five milk dots/spots, each separately, and use a toothpick to draw a line through them. The drops will curl into mini hearts or leaves.
By and large, the twig belongs to the etching technique, but it is so simple that anyone can master it.
Etching technique for latte art
Above we looked at free pouring techniques, where the main principle is to simply pour in milk foam while rocking the pitcher. Etching is a more complex technique; the principle is to draw on the surface using toothpicks or special tools; here they paint with syrups.
- With a toothpick you can create the same heart or twigs from almost any stain, or transform it into a cute animal. We not only complete the lines, but by dipping a toothpick in the espresso, we can draw dark spots on the lighter foam. The main thing is to do this relatively quickly, and not to hesitate, since the bases, although viscous, are not too dense.
- With syrups, everything is also not so difficult. You can draw banal hearts or spirals, as well as intersecting lines, in the cup, but the eye is important to create smooth intersections of lines. The most commonly used are chocolate or caramel sauce, as they always go well with the coffee flavor.
Please note: to paint on coffee foam, you need special syrup-sauces, thicker and in soft bottles. The ones in glass bottles, used to produce dozens of flavors, are too liquid, they will simply fall into foam.
Recipes for coffee with ice cream
You won't spoil any coffee with ice cream. You can add ice cream sundae to any of your coffee drinks, and it will be delicious either way. But sometimes you want something special, and in addition to simple ones, there are also very interesting combinations that you will probably want to try.
It is better to use chilled espresso or Americano, as in a very hot drink the ice cream will quickly melt into warm foam. If you don’t have time to cool, you can make coffee twice as strong as usual and add a couple of ice cubes, or place the pot/cup in a bowl of cold water.
It’s better not to use chocolate-covered ice cream on a stick: the chocolate there is not the best, and if frozen it’s still okay, then when heated, the taste of cheap palm oil will not please anyone. Or separate the chocolate in advance.
The simplest recipe for coffee with ice cream (ice)
Just two ingredients - and very tasty:
- Coffee;
- Cream.
Add ice cream to a cup of your favorite coffee drink. If there is grounds, it is advisable to strain them. If you need sugar, stir it in advance.
Glaze with egg yolks
Sometimes they prepare it this way; this recipe is often used in European coffee shops:
- Americano portion;
- Two egg yolks;
- A spoonful of sugar (as much as you need);
- Cream.
The yolks need to be thoroughly ground with sugar until it melts to form a foam. Next, add coffee, stir, and put ice cream on top. Additions in the form of spices, decorations or liqueurs are welcome.
With orange liqueur
Orange and milk don't go well together, but if it's ice cream and liqueur (or syrup) that's a different matter:
- Coffee;
- Orange liqueur;
- More ice cream;
- Orange zest or candied fruits - if possible and desired.
Place ice cream in a cold Americano, pour liqueur on top, and garnish with zest or candied fruits. Serve with a spoon and straw.
Coffee with chocolate ice cream
Ice cream can also be chocolate, and this taste goes well with coffee:
- A serving of chilled Americano;
- Chocolate ice cream;
- Any additives to your taste.
Add ice cream to your coffee, garnish with chocolate shavings or crumbs, or whatever you like. Can be served in a glass with ice. By the way, strong alcohol in such a drink is also very successful if you add just a teaspoon.
Instant coffee with ice cream
An excellent combination that also enhances the taste of a not-so-best coffee drink:
- Instant coffee drink;
- Ice cream, preferably white.
It’s an especially good choice if you buy coffee on the road or from a vending machine - just buy some ice cream and add it to the cups, it will immediately become much tastier. However, some people prefer an instant drink at home - there will definitely be no grounds. And, of course, various additives will make the cocktail tastier.
Interesting additives and combinations
Since ice cream, if you add more of it and place it on a cold base, does not melt for a long time, it can be decorated with a variety of components:
- Spices: Sprinkle cinnamon or gingerbread spices on top;
- Tasty additives: chocolate chips, chopped nuts, candied fruits, zest;
- Liqueurs: any liqueurs would be appropriate in a cold cocktail, even fruit ones;
- Strong alcohol: rum, whiskey, brandy, cognac - everything that you like to add to coffee;
- Syrups and toppings: anything you want, you can even draw something on the surface.
Try different combinations - it is always tasty and very interesting. The taste of the drink will be special every time!
Stencil latte art
The simplest method that can be used separately or as a supplement. There are special stencils that are placed on a cup, and grated chocolate or cinnamon is poured through them to create an image. You can buy them online (especially on AliExpress) or make them yourself from cardboard (regular paper is too soft).
Important: it won’t work on regular coffee with milk; you need the density of the base, which is obtained from the right espresso and well-whipped foam. Even light cinnamon will fall through almost instantly and melt into an Americano, while chocolate is even denser.
Most stencils are reusable, made of plastic and can be washed. They can also be used to sprinkle different seasonings on other foods, and they are inexpensive, so if you like your coffee with cinnamon, you can buy stencils for simple cappuccino designs and they will come in handy.
Latte art printer
Yes, there is such a thing. The device, presented by an Israeli company, allows you to create designs on coffee using the coffee itself. Coffee beans are ground almost into dust, due to which they are practically weightless and lie well on the surface. The image can be very detailed and clear; the user can upload pictures to the smartphone’s memory, and the device will print the image. Portraits, names, anything, as long as it is in black and white, since there are no color gradations.
Basic models cost about 45-50,000 rubles, more advanced ones, with high-tech controls - about 75-80,000 rubles. They are rarely found in stores; they are usually ordered on AliExpress. But the surprise in the eyes of guests receiving their cappuccino with a design on the foam is worth it for many.
Ideas for beginners.
After such a detailed theory, I can’t wait to start practicing and learn how to make drawings on coffee.
Lesson 1. Heart.
Make a circle with a milk stream from the pitcher, then, without stopping, cross it diagonally. A few precise movements are enough, as experienced baristas do, and the drawing is ready.
Lesson 2. Bunny.
Using the pitcher, we make a circle and above it a heart of the same size. Using a skewer or toothpick, draw eyes, a nose, a mouth and antennae in a circle. We admire how the hare’s funny face is crowned with heart-shaped ears on top.
Lesson 3. Star.
In the center of the coffee cup, make a small circle of milk foam, trace the outline of the white circle with a line of chocolate icing from a pastry syringe, then make another chocolate rim larger than the first. Using a toothpick, draw lines from the center of the white circle to the edges of the cup. The more lines, the more rays the drawn star has.
If you manage to successfully master the basic skills of latte art, you can refer to the video master classes on the topic “How to make a drawing on coffee.”
And don’t be intimidated by the skill of established baristas, because they were once beginners too. Good luck and creative success!
Latte art at home
It's not as difficult as it might seem, but you still have to work hard. Asian barista Caleb Cha, who won the world latte art championship, said that to achieve perfection, he draws on about 300 cups a day, a skill honed over the course of a week. But he can afford such entertainment, and most users do not need such perfection. According to reviews on the Internet, it turns out more or less decently with about the third liter of milk; under the supervision of experienced baristas at master classes, you can “pour out” something recognizable in a day, but in any case a lot of products will be spoiled.
Do not take too expensive grains and the best milk for training. A regular thicker one, at least 3.5%, will be enough.
- Brew decent espresso according to all the rules. Preferably in a carob-type coffee machine, which can brew it correctly. Filters, Turks, and drip models are not suitable for beginners, although you can still do something with a Turk if you get real crema foam there.
- Whisk the milk. It is better to put the jug in the refrigerator for half an hour in advance; milk can be heated in the microwave, but for whipping you will need a steam spout (available on the same carob coffee machines). You won't beat it correctly with a hand whisk. Watch the video for the whipping technique and experiment until you get a dense, even, smooth foam.
- Practice. Start at least with the “heart” to understand the technique of flow, tilt, speed and other important factors.
In a good way, it’s worth learning how to brew espresso at the same time as frothing milk.
Important points of latte art and the main mistakes that beginners make
A basic mistake is trying to portray something using regular milk and regular coffee. In fact, it turns out to be an Americano with milk, which, of course, won’t hold anything. But here are three other mistakes that are made most often:
- Milk pouring too slowly. This leads to stratification of the foam in the pitcher, and as a result there is no density at the bottom, but a difficult-to-pour mass remains in the jug.
- Incorrect lifting of the jug from the surface of the drink when pouring. When you lift the jug from the surface of the drink, the milk sinks into the layer of coffee rather than sitting on top of the cream. First we pour from a height, then we bring the spout to the surface.
- The spout is too close to the surface. This has the opposite effect, as the milk tends to slide across the surface of the rich coffee, so it doesn't create a pattern.
It’s worth trying repeatedly to learn how to make even the simplest drawings on a cappuccino or latte. But then you can decorate drinks without thinking!
Conclusions:
- Coffee with a pattern on the foam is called latte, and the application technique is called latte art. For cappuccino - also latte art.
- The simplest classic technique is free pour, Free Pour Latte Art. This is how hearts, rosettes and flowers are drawn.
- Technique Etching, etching - a method of applying an image to coffee with a toothpick, as well as the use of syrups.
- Stencils are not the most classic method, but they can be used as an addition. There are also printers for latte art, and their works look more interesting, but are far from classic.
- You can learn latte art at home, but the main thing is to brew high-quality espresso and froth the milk well.
How to make a drawing on coffee at home
It is difficult to recreate complex designs on coffee at home, but with proper practice, anyone can master simple figures. One of the important success factors is the correct preparation of milk foam.
Choose whole, unpasteurized milk with a fat content of at least 3-3.5%. Foaming ability is affected by the presence of protein compounds in milk, which are destroyed during boiling. The heating temperature should not exceed +75 °C.
The steam tap in the coffee machine is used for whipping - the cappuccino maker. If you don't have a device, you can use a whisk, mixer, or even a French press. The milk needs to be prepared before making coffee, otherwise the drink will simply get cold. If you have an espresso machine, the processes can be combined.
Preparation using a cappuccino maker is divided into two phases:
- Foaming - a steam tap is immersed in milk 1-1.5 cm from the surface until the volume doubles and the temperature rises to +37 °C.
- Steaming - the barista rotates the pitcher, creating a funnel inside the liquid, due to which the milk acquires a smooth structure and heats up to +75 ° C.
The duration of each operation is no more than 15 seconds. Temperature control is carried out using fingertips. Properly whipped foam is uniform in composition, does not contain too large bubbles and has a pleasant creamy taste with natural sweetness.
"Fern flower"
The crema on the espresso should be dense and well formed. At first, you can sprinkle the surface of the coffee with a small amount of cocoa powder - this way the image will stick better. Drawing begins from the far end of the cup, movements are performed with the hand.
Procedure:
- Form the bottom of the flower, holding the container motionless.
- Slowly draw a snake towards you.
- With the final movement, quickly cross out the drawing in the opposite direction.
A thin stream of milk will tighten the image, and a flower stem will appear on the surface.
"Heart"
Instructions:
- Pour milk into the center of the cup.
- Slightly wiggle the spout of the jug and draw a circle without reaching the edges.
- Raise the pitcher and cross out the drawing along the diameter.
As a result, the image will be stretched in the direction of the final movement.
