A cup of coffee with a pattern on milk foam is a signature feature of many coffee shops and cafes. For the establishment, this is a way to attract new visitors; for the barista, it is an opportunity to show their imagination and creativity.
Doing something like this at home for someone who has not undergone special training and does not have the same technical capabilities as a professional barista is not easy, but you have to try.
If successful, you will present your loved one not just “coffee in bed” (although this is already great), but confirmation of sincere feelings, if it is, for example, a cup with the inscription “I love you” on the foam or a drawing of a heart.
By the way, we talked about who a barista is in a separate article.
Latte art - what is it?
The art of painting on coffee is called “Latte Art”. The authors of the original idea are considered to be Italian blacksmith monks , but this is rarely remembered today - the creation of patterns and inscriptions on coffee foam is done all over the world. Sometimes they limit themselves to simple images of a flower or an apple, sometimes they surprise you with true works of art. Alas, short-lived, it is, meanwhile, in constant development.
On the Internet, for example, you can find photos in which the drawing is colored, it is made using special food dyes.
And some cafes offer this service: a visitor from his smartphone uploads his own photo to a special terminal, which is transferred to the coffee machine, and this smart technology reproduces the portrait with edible paints: compare, photograph, and drink, of course.
A Taiwanese barista named Kuai Fan Chang has gone further than many - she makes 3D drawings. The subject matter, of course, is “on the edge”: spiders, centipedes, cockroaches. Moreover, the design is so believable that not everyone will dare to put a cup with such a topping to their lips, so the barista also offers cuter options, which feature adorable animals: a cat, a turtle, a dog, a bear. Each “beast” takes an average of 15 minutes to make.
But who is the coolest barista is determined by international latte art championships. One of them was won by Scotty Kalaghan from Australia - he made identical beautiful drawings in six cups, working... blindly, behind his back.
3D drawings on coffee from Kuai Fan Chang
1 of 11
Etching technique for latte art
Above we looked at free pouring techniques, where the main principle is to simply pour in milk foam while rocking the pitcher. Etching is a more complex technique; the principle is to draw on the surface using toothpicks or special tools; here they paint with syrups.
- With a toothpick you can create the same heart or twigs from almost any stain, or transform it into a cute animal. We not only complete the lines, but by dipping a toothpick in the espresso, we can draw dark spots on the lighter foam. The main thing is to do this relatively quickly, and not to hesitate, since the bases, although viscous, are not too dense.
- With syrups, everything is also not so difficult. You can draw banal hearts or spirals, as well as intersecting lines, in the cup, but the eye is important to create smooth intersections of lines. The most commonly used are chocolate or caramel sauce, as they always go well with the coffee flavor.
Please note: to paint on coffee foam, you need special syrup-sauces, thicker and in soft bottles. The ones in glass bottles, used to produce dozens of flavors, are too liquid, they will simply fall into foam.
What kind of coffee can you draw on?
For drawing, use strong, thick coffee - cappuccino or espresso, prepared according to all the rules in a coffee machine. A latte will also be suitable for this purpose, only in this case dark (for example, chocolate) patterns will be applied to the white background of the drink, rather than milk patterns on top of the dark-colored espresso. You can find latte coffee recipes in this article.
The instructions for beginning artists emphasize that the main component of success is good milk foam , which is used to apply the drawing. However, your own coffee foam is also extremely important - in a well-prepared drink, it lasts for a long time, giving the master the opportunity to create. Sometimes this foam is sprinkled with cocoa powder, and this adds additional beige shades to the traditional coffee color scheme. Information about the benefits and harms of cocoa powder can be found here. Read the following article to learn how to properly froth milk for cappuccino.
Drawing on milk foam
As we said earlier, in this case we take milk foam as a basis.
To do this, foam it well. So that the foam gains density. The drawing should remain on it for up to 15 minutes while drinking coffee.
If there are small bubbles on the foam, it means it is whipped correctly. Modern coffee makers allow you to obtain such foam due to high pressure. Moreover, chilled milk of 2-4 degrees is used.
If there is something wrong with the foam, it will be loose with large bubbles. It will not be able to stay on the surface for long and will quickly dissolve in liquid.
Varieties of coffee art
Coffee painting is developing in several directions:
- pitching – to decorate the drink, a milk frothing vessel called a “pitcher” is used;
- etching - a design is created using foamed milk, and the artist’s tool is a pointed object;
- cappuccino art - in addition to milk, safe edible dyes are used here;
- multi-art – is a combination of etching and cappuccino art techniques;
- espresso art - the “canvas” for applying patterns is the so-called “cream” - the foam on the surface of the espresso.
Recipes for making espresso coffee at home can be found here.
You can make a drawing using different types of techniques. One of them is called stencil and is more suitable for beginners , since the pattern or inscription is already cut out on a special plate, which greatly simplifies the task of the coffee artist. The second is 3D technology. It’s not hard to guess what it is: realistic, three-dimensional (they can be viewed from different angles) images are the pinnacle of latte art.
By the way, lately this technology has ceased to be the preserve of a select few. A unique Ripple Maker machine has been created, which literally in seconds reproduces drawings and inscriptions from the customer’s smartphone onto coffee foam. The maximum dimensions of the original (text, photograph, including selfies) are 180 x 95 mm.
Read about what raff coffee is, its history and various recipes at the link.
Do you know the difference between a coffee maker and a coffee machine? Find the answer here.
How to draw latte art on coffee foam?
First, let’s figure out what kind of coffee baristas use to draw artistic compositions. Most often, masters use cappuccino, which is prepared by adding milk with thick foam to espresso in a ratio of 1 to 3. Depending on the pattern and the method of creating it, grated chocolate, cinnamon and other ingredients can be added to the cup.
For drawing, the most common choice is full-fat milk with a high content of cream, which gives it a unique taste. However, high fat content is not a necessary requirement - good foam can be obtained by whipping skim, baked and even soy milk.
But the processing method at the factory is really important. Modern industry offers two types of products - traditionally pasteurized and sterilized (ultra-pasteurized). Pasteurization involves heating to 60 °C for an hour. During ultra-pasteurization, the product is briefly heated to 120 °C and immediately cooled. Thanks to this, the shelf life increases from 10 days to six months, but the product partially loses its original structure. That's why pasteurized milk is used for latte art.
Foaming is done using hot steam, which the barista should always have in abundance. The result should be a thick and viscous drink, reminiscent of melted ice cream in consistency. At home, you can do without a coffee maker with a steamer. A French press works well for whipping. Using this tool you can create a product that is quite suitable for drawing.
Another important condition is the temperature of the cappuccino. It should not exceed 60 °C, otherwise the milk protein will begin to break down and precipitate. In addition, at high temperatures, carbon compounds degrade, causing the taste of the drink to turn from pleasantly sweet to bitter. So, if you want to drink something hot, it is better to take plain black coffee.
How to make drawings on coffee
Whatever drawing technique the master chooses, the first thing he does is prepare an invigorating, high-quality espresso or cappuccino in a coffee machine. The drink is poured into a cup or glass (as you like) and sprinkled with chocolate, cocoa powder or cinnamon on top. Thanks to these ingredients, the drawing will turn out to be especially interesting and expressive.
Then milk foam is prepared. Cream (30 percent fat content) or milk (fat content percentage of at least 3-3.5) is best suited for this purpose. The foam preparation technology involves the use of a chilled product , which is then heated to the required temperature and at the same time whipped under pressure.
The whipping process, according to experts, should not be too long, because its goal is to achieve a slight thickening of the product . To simplify the task, in addition to coffee machines, a special jug for milk (pitcher) is provided; use it like this:
- fill the pitcher with milk just below the base of its spout;
- the steam tap of the coffee machine is lowered into the pitcher so that the holes in the tip are a centimeter and a half below the milk level;
- the steam tap of the coffee machine is opened;
- the milk will increase in volume, therefore, in order to maintain a distance of one and a half centimeters, the tip of the tap will also need to be raised up, the duration of whipping in different coffee machines is from 5 to 15 seconds;
- the same amount of time will be required for the procedure called steaming milk - the tip is immersed deep into the pitcher, and 1-1.5 cm now separates it from the bottom, and not from the surface (the jug will have to be slightly tilted so that vortex processes occur in it more actively);
- in 5-15 minutes. the steam tap is closed, the milk at this point warms up to a temperature of 65-70 degrees;
- You can start drawing patterns on the coffee surface using the pitcher’s nose as a “pencil.”
For a beginner, this will be quite difficult to do, but experienced baristas are able to achieve the desired result in different ways:
- placing the pitcher at different heights from the cup (thus changing the strength of the jet);
- adjusting the speed of the jet;
- selecting various points on the coffee surface and directing the jet at them.
To apply patterns, various thin and sharp sticks such as toothpicks are used. They are lowered into the coffee to the required depth, and then lifted, grabbing a little coffee and bringing it to a snow-white surface, and a light dark touch, geometric lines, zigzags, ovals, flowers are applied to it.
To create original coffee pictures, a pastry syringe with a thin nozzle is also suitable; it is filled with liquid chocolate or thick syrup (caramel, strawberry, chocolate) and patterns are created directly on top of the milk foam.
If you don’t get the perfect picture, it’s better to start by mastering a simpler method of drawing - using a stencil, buying a ready-made one, or cutting it out yourself from cardboard. The stencils should be slightly wider in diameter than the cup or mug, but the design should not extend beyond its limits.
If you are making your own stencil, try not to make the slits too thick - this will make the image look more elegant. The stencil is placed over a cup, the surface of which is covered with milk foam, and grated chocolate, cinnamon, and ground nuts are poured onto it. On the dark surface of the espresso it will be interesting to look at an image made of powdered sugar - for example, a swan, a bunny, a deer.
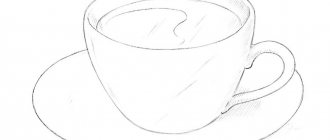
Pattern with a heart on milk foam
- Foam the milk.
- We brew espresso.
- Sprinkle cocoa onto the foam.
Now we wrap our hand around the pitcher and tilt it over the dish where the drink is ready. Pour in the frothed milk. We hold the vessel over a cup, with a height of about 5 cm. Pour the milk in the center. A white circle has formed.
Now we transfer the spout of the vessel to the place where the heart should have a cavity. We approach the coffee with our nose, approximately to a height of 2 cm, and quickly cross out the milk circle in diameter.
We grab the supposed depression and the sharp tip of the heart. All. The drawing is finished.
Thanks to the sharp drawing of the line, the drawing will be tightened to the last drop and the circle will turn out with a depression on one side and a sharp tip on the other. It's clearly visible in the video.
Technique for creating patterns and images
Latte art, as if on three pillars, stands on three basic design elements, these are:
- heart;
- apple;
- rosetta (rose).
It is imperative to learn how to perform these particular drawings, then other, more complex ones will be easier, because they, as a rule, are a kind of combination of basic techniques, multiplied by the imagination of the performer. Here's how it's done.
Heart: mentally draw a circle on the surface of the coffee and fill it with milk through the spout of the pitcher (it should be directed to the center of the circle), at the final stage the pitcher is raised, the stream is made very thin and the diameter of the circle filled with milk is crossed out with it.
Apple: they begin to draw it from the wall of the cup, depicting a small twig, and then, directing a stream of milk into the center of the cup, they create the fruit itself.
Flower (rosetta): the surface is mentally divided into 4 sectors and first the two upper “quarters” are filled, then, shaking the pinscher slightly, the lower left and lower right are filled, the last portions of milk are poured out in a zigzag motion. They complete the work, as in the case of the heart, by lifting the pitcher and crossing out the picture with a thin stream.
Tulip: this image is based on several hearts, which are crossed by a milky stripe “stem”.
The following video will help you consolidate your skills:
Latte art printer
Yes, there is such a thing. The device, presented by an Israeli company, allows you to create designs on coffee using the coffee itself. Coffee beans are ground almost into dust, due to which they are practically weightless and lie well on the surface. The image can be very detailed and clear; the user can upload pictures to the smartphone’s memory, and the device will print the image. Portraits, names, anything, as long as it is in black and white, since there are no color gradations.
Basic models cost about 45-50,000 rubles, more advanced ones, with high-tech controls - about 75-80,000 rubles. They are rarely found in stores; they are usually ordered on AliExpress. But the surprise in the eyes of guests receiving their cappuccino with a design on the foam is worth it for many.
What kind of coffee foam do you need to make a drawing at home?
Pessimists claim that without professional equipment it is impossible to draw patterns on coffee. Optimists try and succeed. The goal is to prepare a foam of such density that it retains the pattern for a quarter of an hour. To do this, the foam must consist of tiny bubbles. If they are large, the mass will be loose and will settle very quickly, dissolving in the drink along with the pattern.
You can obtain foam of the desired density using:
- hand mixer (you should whip the cream while heating it to 70 degrees);
- manual cappuccino maker (it will cope with the task faster).
In any case, the coffee must be brewed in advance, because the milk foam will not wait, it must be put to work immediately.
You can learn about the beneficial properties and contraindications of rooibos tea in our material.
We wrote about the properties: benefits and harms of decaffeinated coffee here.
We wrote about the organization, menu options and what a coffee break is here:
The main thing for drawing is foam
You want to make the perfect creamy milk foam that will create a "cushion" for the drawing, a base on which the white drawing will then rest.
First, you need the milk cold, and don't heat it before steaming. When it comes to lattes, we typically use full-fat milk—skim is definitely not an option for beginners. Pour the milk into a jug and lower the steamer into it, but be careful not to lift it too high. If you see large bubbles, it means the steamer is too high.
Hold the jug with your second hand - when it becomes very hot, it means that the desired temperature of about 60 degrees has been reached. Tap the pitcher on the table to remove large bubbles and thicken the foam. Give the milk a little swirl and it's ready to pour.
While making the crema, brew the espresso. You can even make it in advance, let it cool a little, it's better than the foam settling while you brew the coffee.
Secrets and recommendations
In an art like latte art, not all baristas are willing to divulge their deepest secrets. But even if they share them, beginners have to train for a very long time in order to reproduce the “handwriting” of the master. Here are some recommendations that may be useful:
- to direct the image in the desired direction, the line-jet is drawn with a sharp, fast movement;
- the heart design performs not only a decorative, but also a taste function - the foam flows from the center to the edge of the cup, enhancing the aroma of each sip;
- to make multi-colored designs, you can use syrups with a little starch added for thickness;
- be sure to heat the cup so that the coffee and milk foam poured into it stay hot longer;
- If you need to add sugar to your coffee, it is better to sprinkle it on the foam; if you need to add rum or cognac, pour it directly into the coffee.
How to Sketch Coffee: 3 Ideas and Annotations
So, you have a round (not very flat and not very tall) cup into which a portion of espresso is poured. Now we are trying to draw.
The most ordinary and constantly pleasing sketch. Tilt the cup at a 45-degree angle with one hand and pour the milk into the center with the other. The jug must be held high so that the milk flows through the layer of coffee to the bottom of the cup. When the cup is three-quarters full, shake your hand a little (not the cup, but the jug), then bring the jug closer to the cup and pour until you notice the appearance of snow-white circles. Then, when the cup is almost full, pour the milk in a line from one side to the other through the center.
Rosette, aka plant, leaves
It is called by different names on the Internet, but these are the same leaves of different sizes, it looks like a plant or a twig. Tilt the cup at an angle of about 45 degrees and start pouring the milk, but do not hold the jug very close to the cup. Make sure the milk flow is narrow so that it makes the base as the foam sinks to the bottom.
When the cup is three-quarters full, move the pitcher closer to the cup until it almost touches it. As the jug touches the cup, pour in a little more milk, and you will see a point with snow-white foam. In this step, start moving the jug from one side to the other. When you reach the edge of the cup, start pouring less milk, lift the jug and pour a stream of milk through the center. It turns out that you will first draw the wide part, reach the tip, and later draw a line to the base.
Chocolate star, snowflake
To prevent the syrup from getting to the bottom, you must make your foam thicker, this will keep it on top. Beat it a little harder. Using the syrup, draw a spiral from the center of the mug to the rim. Then take a toothpick or something a little thicker, and then pull the strips from the center to the edge. Make 5 stripes so it looks like a star. Then between these lines make stripes from the edge to the center. Ready! Don’t forget to wipe the tip of the toothpick with a napkin after each strip.
The syrup should be in a bottle with a narrow spout, not watery, not in glass bottles with a portion dispenser.
You can draw anything with chocolate or write inscriptions on the thick foam cushion. You can also make a branch:
Draw a snake along the edge of half the cup and stretch it with a toothpick - you get a plant branch. And in the center you can draw a circle, and stretch it with a toothpick to get a heart.
Ideas for Beginners
Beginner baristas should be patient and practice drawing basic shapes. Of course, having previously prepared a high-quality coffee drink for use as a “canvas”.
You should not study more complex techniques until you can draw quickly and clearly:
- Heart - milk is poured at a distance of 5 cm into the center of the cup in a circular motion, after which the circle is crossed out with one sharp line. At the intersection of the circle, the foam will tighten and the entire pattern will take the shape of a heart. You can decorate it with topping or additional openwork lines along the contour.
- An apple is drawn in the same way, only first the stem is applied at the edge of the cup: a small amount of milk is poured in and extended to the fruit. Actually, it looks like a heart hanging on a branch.
- Flower - you need to pour milk from the far wall of the cup towards yourself, shaking the pinscher in a zigzag motion. At the end, draw a clear straight line right in the middle, holding the jug at a height of 15-17 cm from the surface. The foam will stretch along the drawn line and complete the drawing.
Applying basic images to foam will allow you to develop the skill of working with coffee foam and milk. And subsequently diversify your art with additional colors, ingredients and accents.
Coffee foam painting is popular all over the world. And the more complex the design, the more expensive the drink itself is, despite the fragility of the “work.” But you can learn how to draw different shapes on coffee at home. You just need to spend a little time watching training videos and practical experiments.
Basic elements of pitching technique
To understand how frothed milk behaves and how to draw on coffee using a milk jug, you need to master a few simple shapes. Then, based on them, you can learn to make more complex drawings.
Heart
This easy-to-make element is invariably popular in coffee shops. You need to pour the milk into the center of the cup to form a circle. Cross out the white spot with a thin stream, raising the milk jug higher. A depression will appear at the top, and a pointed tip at the bottom.
Star
Make a white circle in the middle of the cup and pour in the milk. Trace the topping around the outline using a pastry syringe. At some distance, make a circle of larger diameter. Using a toothpick, draw several lines from the center of the stain to the edges of the cup.
Rosetta
This figure is similar to a leaf or flower. The espresso cup is held at a slight angle. Milk foam is poured in, making semicircular lines one above the other with the pitcher, gradually reducing their length. Then, moving downwards, you need to cross out the lines, drawing a stem. The lines will bend slightly and pull down.
Anyone can create latte art on cappuccino coffee foam. It is not difficult to master stenciling or engraving techniques, and real coffee art artists endlessly hone their skills.