A beginner will make a stylish topiary in a few hours. An unusual composition is a wonderful decoration for a residential or office space and an unusual gift. To make it you will need patience and some materials: coffee beans, twine, glue and a number of tools that can be found in a hardware store. You need to start the creative process by choosing a composition design.
Topiary “Flying Cups”: searching for inspiration
Coins, seashells, buttons, beads, pearls and coffee beans are used to create creative crafts. When choosing a material, you need to build on your own preferences and available resources. Another reference point will be the upcoming occasion: Easter, birthday or February 14th.
Regardless of the occasion and materials chosen, topiary is initially created on paper. Unlike real materials, you can design a composition on a sheet as many times as you like. If thoughts don’t come to mind, then a master class will come to the rescue. Watching video fragments will not take much time.
As an additional means of finding inspiration, it is recommended to use:
- View thematic catalogs.
- Visiting handicraft shops.
- Watch programs about design.
- Poll of friends and so on.
After analyzing the various options, you can choose the one that best fits into the interior. It must be remembered that flying compositions are selected taking into account the prevailing color in the interior. Once the project is approved, work can begin. Before going to the store to buy a list of necessary materials, it is better to think in advance about what you will need. Regardless of the size of the composition, it is imperative to purchase a cup and saucer. It is desirable that they combine harmoniously.
How to make a beautiful topiary magnet is described in this material:
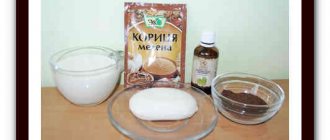
Materials
1) tea or coffee pair (cup and saucer)
3) thick wire or triple wires. You can use other flexible items, such as old aluminum forks or spoons, or a metal hanger.
4) polymorphus ( superplastic ) – self-hardening thermoplastic. When heated, it becomes plastic and convenient for giving it the desired shape. When cooled, it becomes hard, elastic and durable.
5) masking tape - it can replace superplastic
6) modeling mass , can also replace polymorphus. It resembles plasticine, but unlike it, it hardens well in air. Contains natural ingredients (dough made from cereal flour), so it is absolutely safe for children.
7) decoration items : coins, flowers, pine cones, feathers, candies, beads, buttons, ribbons and much, much more.
DIY Easter topiary “Flying Cup”
It is more fun to celebrate a holiday when it is decorated with stylish compositions. One of the most common is the “cup of abundance.” It is done in light colors, using shards or pebbles. Designers urge not to limit the flight of imagination. The main thing is to adhere to a sense of proportion, otherwise the composition will not stand still.
An Easter floating mug is created in a few hours.
To do this you will need the following materials:
- Painting tape.
- Shards from an old pot.
- Sisal green.
- 20-25 pieces of plastic eggs.
- Artificial roses or a set of flowers.
- 3-5 branches.
- Thermal glue.
- 3-4 small chicken figures.
- A fork that needs to be bent using pliers.
To avoid accidental damage to the dishes, the place of contact between the bent fork and the cup and saucer must be covered with tape. Carefully stick the fork with its tines to the bottom of the saucer. Glue drying time is 35 minutes. After making sure that it is really dry, you should fix the fork handle on the bottom of the cup.
When creating a composition with your own hands, you need to remember safety precautions. Immediately after securing the cup at the top, it should be supported with a thick, high box. A simple technique will not allow the composition to fall apart until the glue dries. Attention and accuracy will be needed when decorating the lower part of the composition.
It is necessary to choose it wisely - the stability of the base ensures the durability of the composition. For these purposes, decorative pebbles are used, on top of which sisal is laid out. Masking tape will help to disguise the fork, onto which the sisal is attached with a glue gun. Using a similar tool, the upper part of the inner surface of the mug is decorated with decorative branches.
Topiary made from money and coins will perfectly complement the interior of your home:
The design of the saucer includes decorative Easter eggs, which are fixed with a glue gun closer to the rim of the base. The eggs are laid out in such a way that the roses fit into the gaps. If desired, the composition is complemented with lace or sequins.
Assembling and decorating topiary
Let's wait for the paint to dry, push the wire through the hole and bend its end so that it can be secured to the saucer. In this case, you need to cut a niche in the bottom of the cake to hide the wire squiggle there.
We cover the cake with coconut shavings, to do this we treat our cake with acrylic varnish and sprinkle it on all sides. The varnish will reliably stick the chips and give the product shine.
Next, decorate the saucer with a chocolate snake, for this we use a syringe and brown acrylic paint.
Then we fix the curved end of the wire on the saucer using hot glue. We hold it in this position for some time until the glue hardens.
Next, we glue the cake itself to the saucer, and begin to decorate the wire that holds our floating cup.
First, we cover the wire with a napkin, and the topiary will begin to take on its shape.
Let's sort out the beautiful coffee beans for decoration, then glue them onto the frame. Next, “spill” the glue onto the cake, generously enough so that it drips onto the saucer.
Mix acrylic paint with acrylic varnish in a 1:1 ratio and add a little water. We cover our chocolate-coffee stream with this mixture. It’s not scary if the paint gets on the coffee beans; on the contrary, it will even look more natural. And we glue three more grains onto the top of the cake itself, as if they had accidentally scattered.
The final touch in the master class: place a spoon next to the cake and fix it with glue; in this master class I used a ceramic spoon. Next, glue a slice of cake to it. Now the floating cup composition is completely assembled and is ready to delight you with its originality and splendor! We have created not just an exclusive gift for connoisseurs of invigorating coffee, but also an original do-it-yourself air freshener that smells like coffee!
At the end of the article, as always, I want to introduce you to a master class on creating a floating cup composition with your own hands in a different and very original way. Materials for topiary - super glue, epoxy, brown paint, car varnish, clay, masking tape, threaded rod, washer, and of course a cup. Before gluing the rod to the cup, you need to sand the glass, otherwise the epoxy will not stick. When handling, be careful, the cup may break; it is better to do this with gloves.
Coffee topiary “Flowing mug”
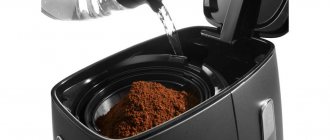
Fans of the strong drink will please themselves or loved ones with a stylish interior detail. To make it you will need materials, as in the previous case. The only exceptions will be a few moments related to the main decorative element - coffee beans. You should choose them not in the market, but in the store. In this case, the special aroma will remain for a long time.
Designers do not recommend taking goods that have been lying on the counter for a long time. Such grains are heavily saturated with atmospheric moisture and odors. In order for a flying coffee composition to be truly spectacular, you will need 500 - 700 grams of beans to make it.
The further procedure is as follows:
- Choose a geometric shape for the composition: ball, heart, etc.
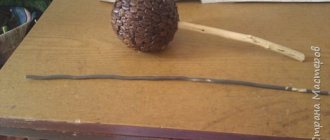
- Find a stick or pencil that will act as a base.
- The craft can be installed in any container the size of which matches the design.
- Mix the fixing solution in a pot and quickly insert the base of the composition into it.
- Make a hole in a pre-selected geometric shape that is used for fastening to the trunk.
- Cover the base with masking tape.
- The first layer of coffee beans is applied with the strip down, and the second - up.
For beginners, it would be useful to know that after each stage of pasting, at least 30 minutes pass before the next one begins. The specified time is enough for the glue to dry. The creative process is completed by fixing a wire that is strong in its structure on the cup and saucer. To do this, you need to bend both ends of the wire by 4-5 cm, moistening them with thermal glue.
Floating money mug
A floating mug made of coins and coffee beans looks very stylish. The design technique of using an unfastening zipper will also add originality to your mug. Keys, bells, old small toys - everything can be used as decorative elements for your mug.
With coins you can also use imitation bills in which we pack candies.
The secrets of creating a money mug can be found in the Sveta DIY video tutorial:
The money tap is created using the same principle as the flying mug. Instead of a mug, we use a plastic tap, and a small chest or casket can replace the saucer. Coins will look more impressive if they are coated with gold spray paint or varnish.
Children's topiary “Floating Cup”
The flowing compositions, unusual in form and content, will delight both children and adults. Light and calm tones are chosen for it, for example, blue, orange or burgundy. As a basis, topics related to the child’s favorite animated characters, literary heroes or hobbies are chosen. Photos of finished options will give you some ideas.
We also recommend learning how to create a topiary from corrugated paper:
The designers have developed recommendations to help you make your choice:
- If we are talking about a girl, then samples of princesses or a fairy house are chosen as a blank.
- Boys will be easily impressed by a hovering alien flying saucer, a super hero or an airplane.
- Baby wants a pet? Then a figurine of a psi, cat or bird is taken as the basis.
Flying mug of fruits and berries
With the help of plastic fruits, berries, and mushrooms, you can create such an abundance of fruits and berries pouring out of a cup. Butterflies will perfectly complement your fruit and berry cornucopia.
A floating cup can be decorated with bright gifts of autumn. Dried leaves and flowers can also be used. The mug can be replaced with a wooden barrel made from simple ice cream sticks.
Flowers and fruits are harmoniously combined in a floating stream. Butterflies, dragonflies, and ladybugs will be a wonderful “live” addition.
Topiary for beginners (photo)
Flying mug made of beads
Pearls are the most noble decorative element that will add festiveness and pomp to any craft! A simple white tea pair can be transformed into such a pearl miracle!
A very delicate floating bowl will be made from soft pink satin flowers and matching pearls. A white dove will perfectly complement the composition).
Beads of different colors will also help create a unique spill cup. Flowers and ribbons of the same shade as the mug will perfectly decorate and complete the image of your cup.
Master - Irina Khokhlova
Sea floating mug
Marine themes have found application in this type of creativity. Surely many people have shells at home that they brought from vacation. Using shells, beads, crystals, you can create a creative cup with seafood...
…. flying shell, replete with chic black pearls.
Broken shells, painted ceramic shards - you can safely use all this to decorate your designer mug. Create your own sea harmony.